Two simple ways to import PST file into Exchange Online

Published On - September 13, 2024

Exchange Online is a key component of Microsoft 365 subscriptions and is used as a cloud-based messaging platform among organizations. Through the Outlook application, like Outlook on the web, users connect to Exchange Online to access efficient email communication, data protection, and collaboration utility. This flexibility empowers users to manage their emails and tasks on their terms.
It stands out among others with its advanced customization settings, enhanced search capabilities, and the utility of all-time accessibility to email data & cloud-based service. These unique features drive users to perform the import PST in Exchange Online task. So, to use the mailbox content of the Outlook application or another saved PST file in Exchange Online, follow the given manual approach to execute it efficiently.
Manual way to import PST into Exchange Online
Performing this operation without the proper guidance leads to several issues that make your data vulnerable to loss or damage. So, after going through several hits & trial approaches, we have come up with the best possible solution to accomplish the upload PST to Exchange Online task. Hence, go with the given steps with utmost care to get accurate results:
- Sign into Office 365 with the administrator credentials.
- Go to the Admin centers & tap on the Exchange.
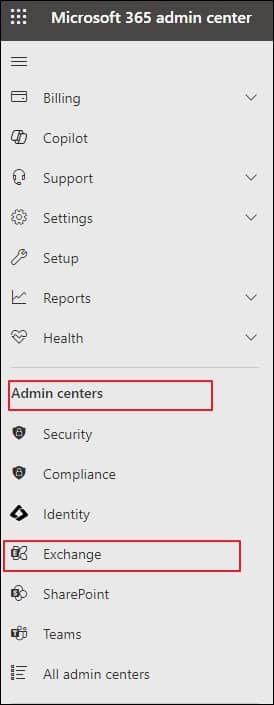
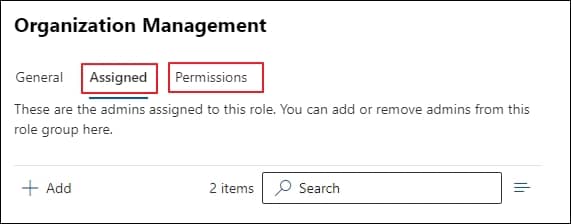
- Tap on the Roles > Admin roles> Organization Management.

- In the Organization Management window, choose the users for Permissions & Assigned Admin name accordingly.
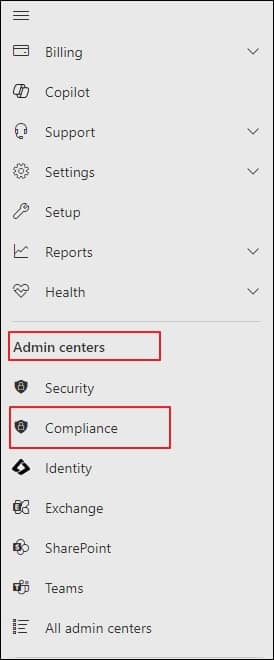
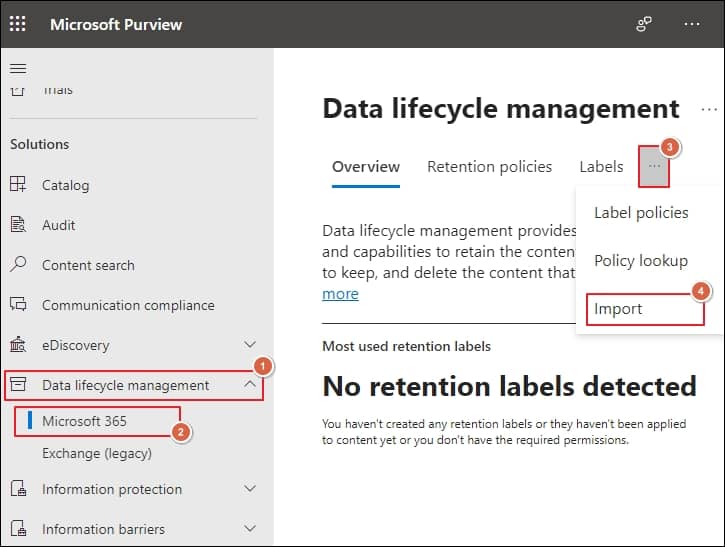
- Go to the Microsoft 365 Admin centers again & tap on the Compliance option.
- Select the Data lifecycle management> Microsoft 365 option & then choose the Import option from the Labels drop down.
- Now, click on the + New Import job option in the next section. You will then see a hierarchy of options that you should follow one by one.
- Type the name of the PST import job as per the given conditions & then tap on the Next option.
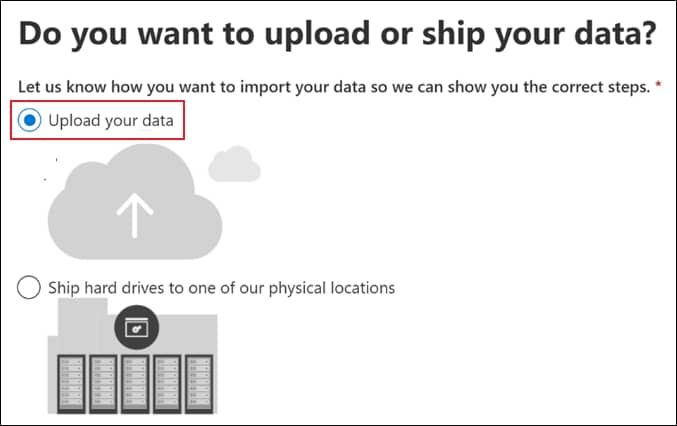
- Click on the Upload your data option in the next window & hit on the Next option.
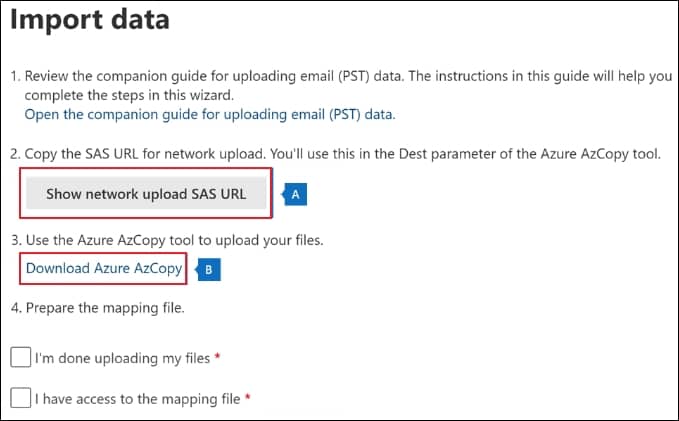
- Go to the Copy the SAS URL for the network upload section and tap on Show network upload SAS URL. Then, Download Azure AzCopy to your local system.
- To import PST to Exchange Online, open the Command Prompt & access the location of the downloaded azcopy.exe.file. Then, execute the following command to upload your PST files into Office 365:
azcopy.exe copy “<Source location of PST files>” “<SAS URL>”
After executing the command, your PST files will be saved to Azure Storage.
- Once you have uploaded the PST file, you need to create the PST import mapping file in CSV file format, which indicates the user’s mailbox that you want to import. This file will be submitted in the upcoming step.
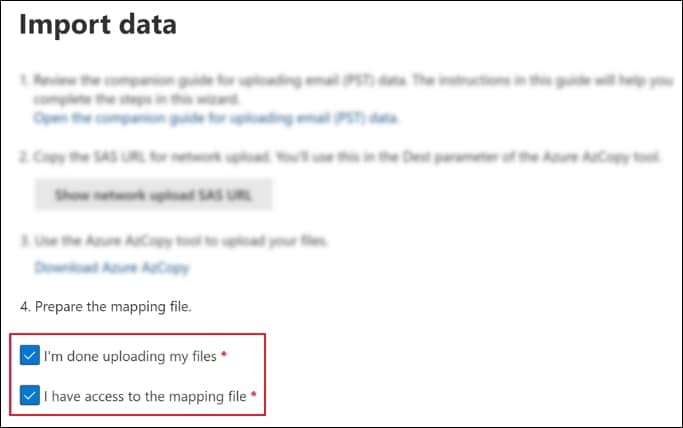
- In the Prepare the mapping file section under the Import data window, check the I’m done uploading my files & I have access to the mapping file option.
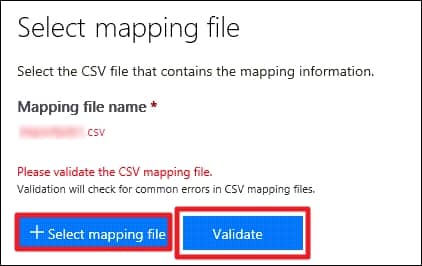
- Under the next page, Select mapping file name created in CSV format earlier. Then, Validate the same CSV file to detect errors.
- Once the CSV file validation process is completed, tap on the checkbox after reading the terms and conditions document.
- Then, go to the Refresh option to update the status until it becomes Analysis completed.
- Under the Import section of the compliance portal, choose the created import jobs and click on the Import to Microsoft 365 option. This will display the Filter your data window, through which you can filter out specific data for importing.
- Once you have followed all the instructions mentioned above, choose the Import data option to initiate the import job. This will successfully complete the import PST in Exchange Online process.
Why is using the manual method not preferable?
Following the manual method will upload PST to Exchange Online, but users might face certain restraints, such as being prone to data loss, tiresome, and complex, which makes the task challenging and frustrating. So, professionals or experts recommend using the automated Import PST to Office 365 to avoid all limitations or uncertainties and make the import PST file to Exchange Online process quick and straightforward.
Utilizing a robust tool to import PST into Exchange Online
Recoveryfix PST to Office 365 is one such advanced tool with user-friendly features. Its advanced and robust algorithms make the tool easy to use. With its adaptive filters, you can import unlimited PST and OST files of any size to Office 365 directly. It even supports incremental PST file migration, removing duplicity in the destination Office 365 accounts. Here are some significant features that make the tool suitable for range of users:
- Its versatile features help users migrate data to Office 365 Groups.
- It even allows you to export your mailbox data to different Office 365 folders.
- Save the complete report in CSV format so you can use it further.
- Removes redundancy through the Exclude unnecessary folders filter.
- It saves time when filling out the details using an automated CSV file-based migration utility.
Conclusion
Import PST file to Exchange Online or migration of Outlook emails to Office 365 can be possible by following the above-mentioned method. However, complex technicalities, data insecurity & long processes create an unusual situation for the user to accomplish the process. Therefore, utilizing the recommended automated tool can be beneficial for an instant, hassle-free approach.