The range of Outlook’s features makes it one of the most preferable email communication platforms among organizations or users. Outlook’s mailbox content is stored in the OST file that can be accessed offline, and the changes performed will automatically sync once your connection is restored.
In some instances, users look to transfer OST file to new computer due to their personal or professional reasons. The Outlook application comes with a default feature that allows users to import a PST or CSV file. Hence, executing the transfer OST file to new computer process becomes challenging until you have converted your OST file to PST format.
So, if you are looking for the same, this blog will help you provide the best possible solution to get your desired result successfully. Before diving into the discussion, it is important to locate an OST file, which can help you in many ways, such as accessing your OST file data when you are offline.
How do you locate the OST file on computer?
There are multiple ways to track the OST file; here, we have come up with the best error-free approach to locate your OST file on your local computer. Therefore, follow each step very carefully:
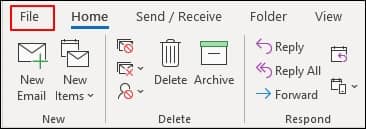
- Open the Outlook application & tap on the File option.
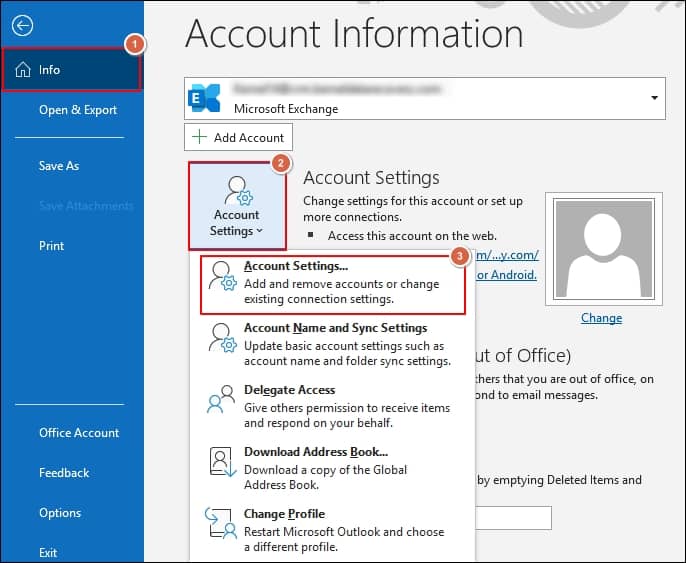
- Go to the Account Settings> Account Settings option in the next window.
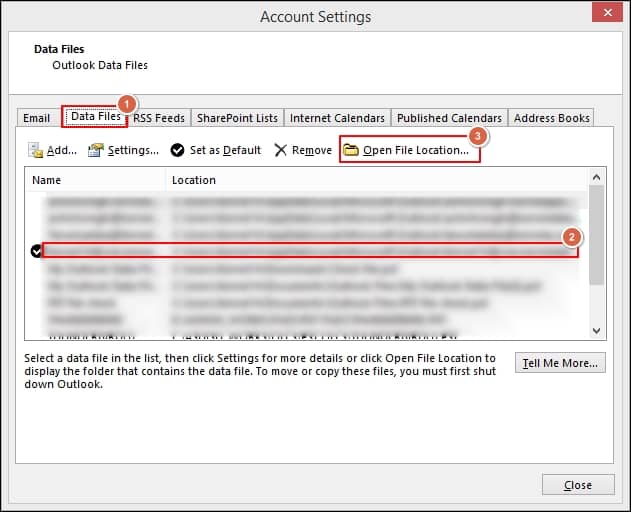
- Select Data Files, choose the desired account of which OST files you want to locate & then click on the Open File Location to access the location of your OST file.
Best way to transfer OST file to new computer
To perform this operation successfully, we will divide the process into parts: first, we will transfer the OST file from Outlook into PST format, then share that PST file with another system, and finally, use that PST file in a different Outlook application. So, let’s start the discussion in detail:
- Access the Outlook application & hit the File option.
- Select the Open & Export > Import/Export option.
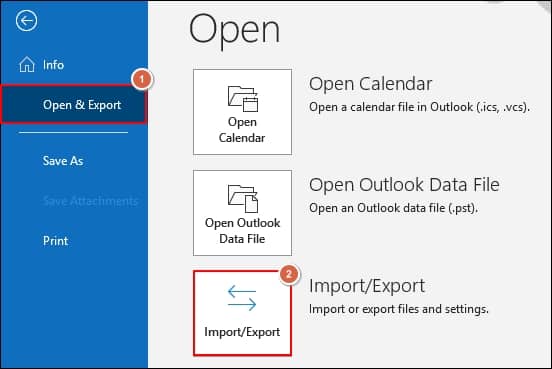
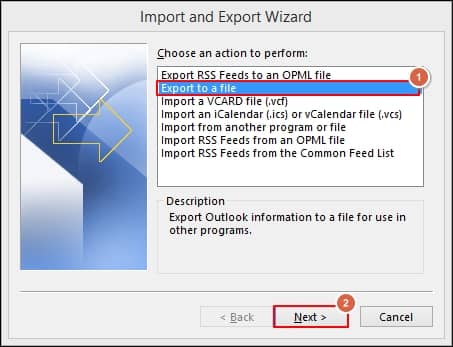
- In the next section, choose the Export to a file option and tap on the Next option.
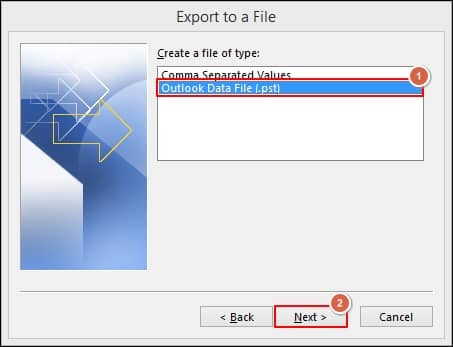
- Tap on the Outlook Data File (.pst) and click on the Next option.
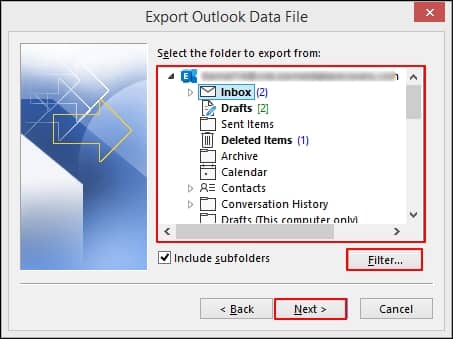
- To make your transfer specific, choose the desired folder and corresponding filters. Then, tap on the Next option.
- In the next window, Browse the saving location and choose suitable Options. Finally, click on the Finish option to initiate the process.
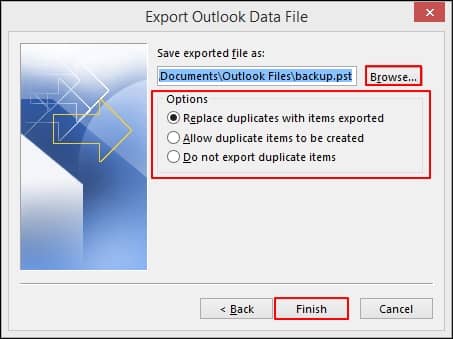
Note: If you want extra layer security, you can set up the password for the exported file. Otherwise, you can move ahead without providing any passwords.
Now, you have your OST file content in the PST format that you can share easily with another system. After sharing to the desired computer, do the following operations to complete the transfer process & use the OST file content in the different computer:
- Start the Outlook application & click on the File option.
- Click on the Open & Export > Import/Export option.
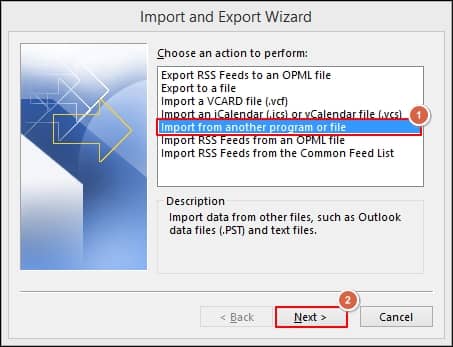
- Under the Import and Export Wizard, select the Import from another program or file option. Then tap on the Next option.
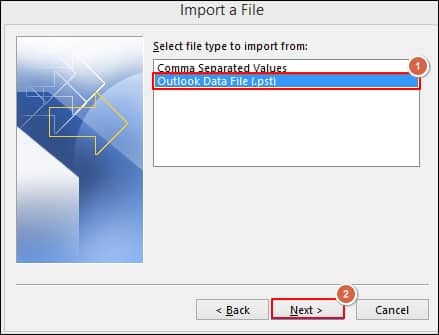
- Choose the Outlook Data File (.pst) option under Import a File page & click on the Next option.
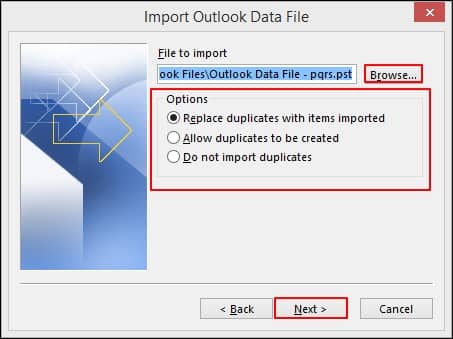
- Browse the location of the PST file & select the suitable Options, and then tap on the Next option.
- Select the folder to import from with suitable Filters and the destination for storing the mailbox content. Finally, click on the Finish option to complete the process, and then restart the application to check the changes.
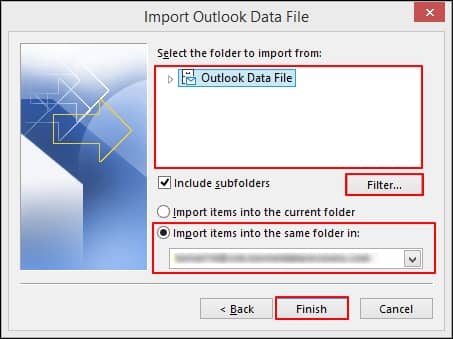
This way, you can successfully transfer OST file to new computer.
An alternate approach to make the process instant
Although the mentioned methods can help you transfer OST file to new computer, it has certain limitations which might disturb your workflow or increase the time of getting the desired result. So, experts are always advised to choose the alternate automated OST to PST converter software to save time without any risk. Being the most versatile or feature-rich software, Recoveryfix OST to PST converter stands out as the best one in this category. It allows you to convert Outlook OST files into PST of any size & number instantly without disturbing the integrity of the mailbox items. It also helps in managing the OST file size issues like OST file has reached maximum size with its split PST file feature. It even supports the migration of OST files into different platforms like Office 365, Live Exchange, Outlook.com, Gmail & other IMAP servers efficiently.
Wrapping Up
Using the same OST file content in different systems creates a need to transfer OST file to new computer. To address the issue significantly, we have discussed the most suitable approach. Follow each step carefully to execute the transfer OST file to new computer process successfully. However, you can use the recommended tool if you are concerned about data security or want a quick or straightforward method all OST related issues like Outlook OST file cannot be opened. For hands-on experience, you can explore the trial version of the software.


