Turn off Cached Exchange Mode for Microsoft 365 shared mailboxes – Complete guide

Updated On - October 25, 2024

Cached Exchange Mode is Outlook’s built-in utility, which stores your Exchange server mailbox cached items in an OST file on your local system. It enables you to access and modify the data even in an unstable internet connection & will sync with the Exchange server once the connection is restored.
Using this utility provides several benefits to the user like minimizing the server load, making Outlook more responsive, and enhancing its productivity. It has, by default feature of having a local cache of around one year. However, you can change settings as per your requirements to limit the mail items in the file.
However, using this utility for a long time will create several issues with the working of Outlook that might hamper the user’s workflow. So, before moving further, let’s understand the need turn off cached exchange mode for shared mailboxes.
Need to turn off Cached Exchange Mode
There are several reasons which create a need to turn off cached exchange mode for shared mailboxes. Let’s discuss them here:
- Enabled Cached Exchange Mode increases the size of local memory or OST files, which reduces the performance or productivity of Outlook.
- Oversized OST file also leads to synchronization issues of email clients with the Exchange server.
- It also comes with the Shared Public folders utility in Outlook 2010 or later versions, which also increases the size of the OST file with time and makes the OST file more vulnerable to damage or corrupt.
- Makes Outlook less responsive while performing operations over it.
Best ways to turn off Cached Exchange Mode
Turn off Cached Exchange Mode for shared mailboxes process helps you to access the mailbox in real-time without any local cache. So, after thorough research, we have come up with three basic methods that help to disable the mode. You can choose any of the methods that suit your requirements.
Solution 1: Using Outlook to turn off Cached Exchange Mode
Outlook’s built-in utility also provides you the option to disable the Cached Exchange Mode. Thus, follow the given simple steps to execute the operation:
- Open the Outlook application & go to the File menu.

- Click on the Account Settings> Account Settings option.
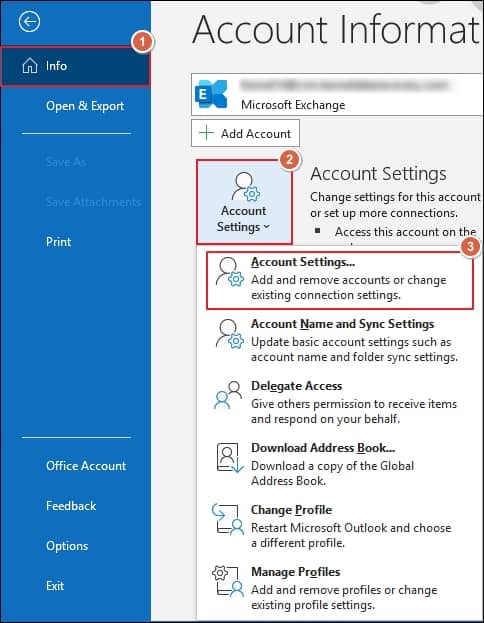
- In the Email tab, double-click on the account.
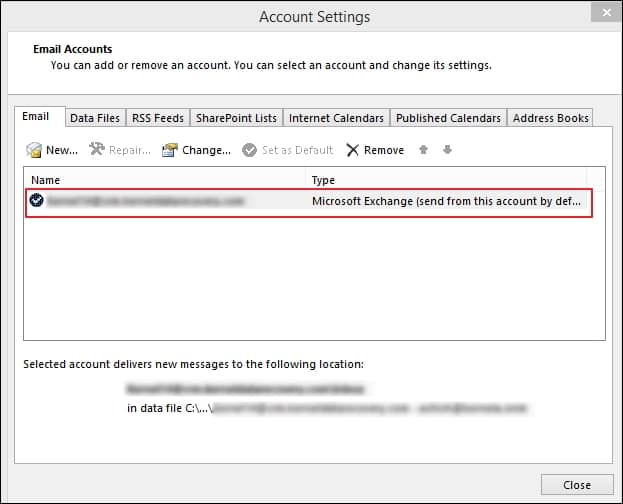
- Now, go to the More Settings option.

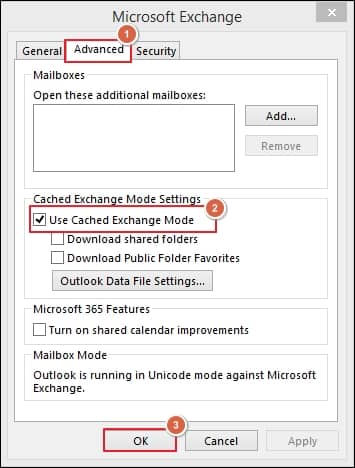
Note: You can disable the Cached Exchange Mode from the opened window & also set the duration of the cached data.
- Finally, go to the Advanced section & uncheck the Cached Exchange Mode option.
Note: You may not find the Cached Exchange Mode utility if you are not using Exchange, Office 365, or Outlook.com account. Thus, you can try the below methods for disabling the mode even in the case of a POP/IMAP account.
Note: You can also reach here by following the given steps:
File> Account Settings> Manage profiles> Email Accounts
Solution 2: Using Group Policy to turn off Cached Exchange Mode
Using the Group policy can also help you to disable the Cached Exchange Mode. It comes out as the most efficient method for disabling the Cached Exchange Mode in the latest Outlook versions.
Note: Before executing the policy, you need to install the corresponding Administrative Template files (ADMX/ADML) on the Exchange Server.
Let’s look at the steps to perform the task:
- Copy the ADMX & ADML file to C:\Windows\PolicyDefinitions & C:\Windows\PolicyDefinitions\en-US locations, respectively.
- Press the Windows + R key & type gpmc.msc to open the Group Policy Management.
- In the Group Policy console, right-click on the Organizational Unit (OU) in which you wish to apply this policy.
- Now, choose the Create a GPO in this domain and link it here option & type the name of the policy. Then, click on the OK option.
- Right-click on the GPO that you created & choose Edit.
- Now, create a new GPO by following the given steps:
Go to User Configuration> Policies> Administrative Templates> Microsoft Outlook version > Outlook Options > Delegates. - Double-click on the Disable shared mail folder caching policy & choose the Enabled option from the pop-up window.
- Tap on the Apply option followed by OK & then restart your Outlook application.
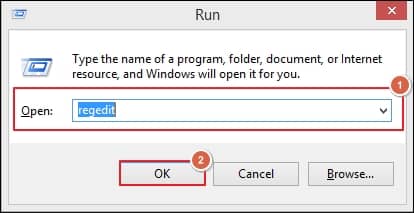
Solution 3: Using Registry Editor to turn off Cached Exchange Mode
It enables the administrator or advanced user to make changes in the configuration at the root & administrative level. So, it needs utmost attention while performing the task. Here are the steps to execute the registry editor successfully on your system:
- Tap on the Windows + R key & type the regedit command.
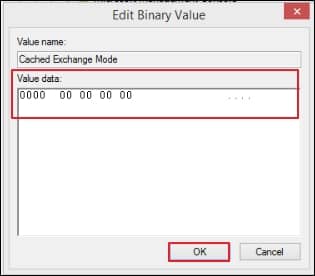
- Now, navigate to HKEY_CURRENT_USER\Software\Microsoft\Office\VERSION\Outlook\Cached Mode.
- Right-click on the free space to get the New option, tap on it & choose the DWORD (32-bit) value to create the new registry cache.
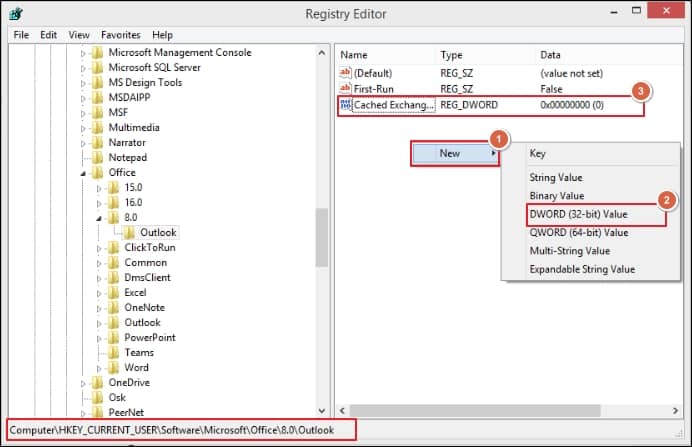
- Enter the value 00000000 to disable the Cached Exchange Mode.
- Now, close the registry editor window & restart the Outlook application.
What complications may you face after disabling the Cached Exchange Mode?
Disabling the Cached Exchange Mode will stop storing more cached data in your OST file. It means whatever you work online will never be stored in the file, which may affect the user’s productivity in the long run. It will create issues like, you are not able to access the current mailbox content offline. Also, if your Outlook profile is missing or your OST file gets corrupted, then it will become challenging for you to access its contents.
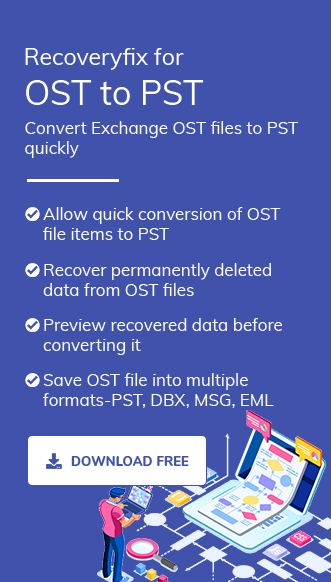
In these situations, it’s crucial to back up your data and move it to a secure location for future use. However, unlike PST files, OST files are not directly accessible, and Outlook does not support the transfer of OST files between different Outlook accounts. Therefore, it’s necessary to convert your OST file to PST format for effective backup.
Several manual methods can do the same conversion, but they won’t assure you data security. Therefore, using automated third-party tools like Recoveryfix for OST to PST is a beneficial & time-saving approach to counter all errors detected in the OST. It helps you to recover or repair your corrupt or damaged OST file to the PST format. Also, through its advanced algorithms, you can take a backup of your OST file into desirable format, including PST, MSG, & many more.
Summing up
Cached Exchange Mode increases the responsiveness of Outlook, but with time it increases the file size. It starts creating trouble in the performance of Outlook by delaying the operations. So, we have discussed the manual methods in the blog to turn off cached exchange mode for shared mailboxes. Additionally, the blog has discussed the consequences of doing the same & suggested the most recommended tool to secure the content from the worst scenarios.