While looking at the features of Zoho Mail, it is evident that it provides all the effective features that users need for efficient email communication. Features like advanced email services and integrated extensions help users to boost their overall productivity.
Despite these advanced features, Zoho Mail still needs to improve its security compared to advanced email clients such as Outlook. It might be one of the major reasons that users prefer to take backup Zoho Mail to Outlook. Be with this detailed discussion to find out the top reasons & solutions to address it.
Note: Zoho mail supports EML format for emails, whereas Outlook supports PST format.
Why do users need to backup Zoho Mail to Outlook?
Compared to EML files, PST files offer additional benefits that aspire users to add Zoho mail to Outlook. Let’s look at those additional ones:
- With PST files, users get easy accessibility to other Microsoft 365 services.
- Outlook provides additional security & better facilities compared to others.
- PST files store entire mailboxes or folders, whereas EML files are limited to email messages only.
- Unlike EML files, users can store large amounts of email data using PST files.
- Outlook’s regular updates help users upgrade themselves in the digital world.
Top methods to export Zoho Mail data to Outlook
After extensive research, we have mentioned some effective measures to execute the export process. Choose any of the methods mentioned that meet your expectations.
Method 1. Use all-in-one advanced solution
For structured & accurate results, choosing the advanced Zoho mail backup tool can be the best possible approach. It saves time and provides extra data security & assurance of 100 % successful results.
Recoveryfix converter for EML stands out among others due to its wide range of features & advanced filters. It helps users to convert EML & EMLX, MSG, and OFT files to different formats as required.
Let’s verify the credibility of the tool with the following steps:
Step 1. Download the EML to PST converter software from the Official website.
Step 2. Complete the installation process on your local system.
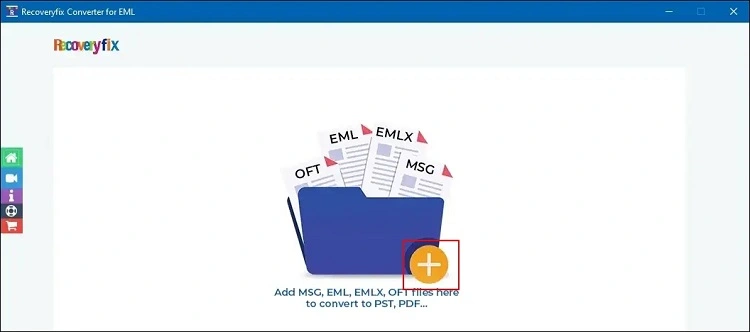
Step 3. Open the software and click on the + icon to add the desired files.
Step 4. Tap on the Set filter & Migrate option for further process.
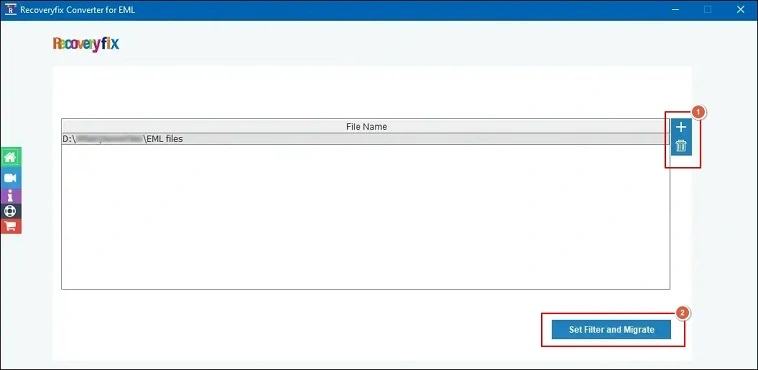
Note: Here, you have the option to delete the EML files that you don’t want for conversion.
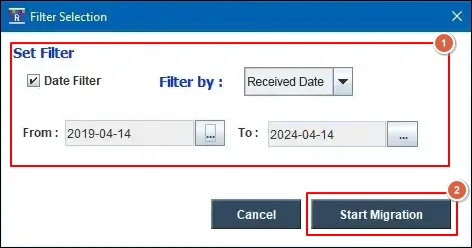
Step 5. Now, choose the required filters to get the desired data from Zoho to Outlook. Then, click on the Start Migration option.
Step 6. Select the PST format as the Output type, Browse the location where you want to save the converted files & click on the OK option further.
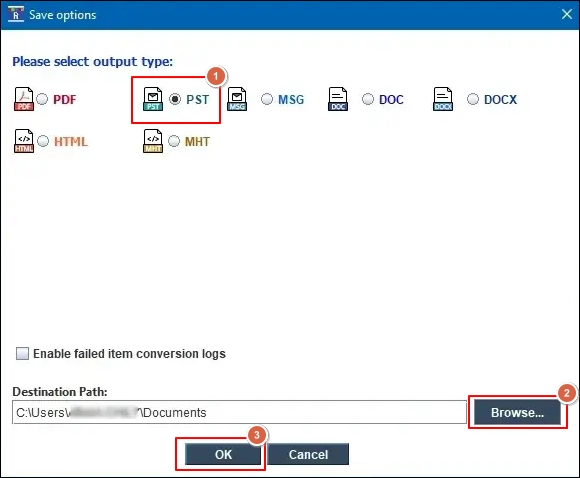
Note: With its high-tech features, users can select other file formats as output such as PDF, MSG, DOC, DOCX, HTML, and MHT.
Step 7. Wait until you get the prompted message that the file conversion is successful. Then, click on the OK option to complete the process.
Method 2: Export Zoho mail with Outlook
Here, with the help of Zoho mail & Outlook, we will backup Zoho mail in Outlook. Users need to configure their Zoho Mail in the Outlook application to implement the process. It can be done by enabling IMAP in their accounts. We have divided this solution into three parts to execute the complete process. Explore them carefully.
Part 1: Enable IMAP in Zoho Mail account
Here, you need to follow the given instructions to enable IMAP in Zoho Mail account.
- Step 1. Go to Zoho.com and log in with your account credentials.
- Step 2. Access Settings by clicking on gear icon.
- Step 3. Click on Mail accounts option under Settings.

- Step 4. Navigate to the IMAP tab under the Mail Accounts section, then check IMAP Access, Auto-Expunge Emails, and Include Archived Emails option.

- Step 5. It will enable IMAP settings for your account.
Part 2: Configure Zoho Mail account into Outlook application
Configure Zoho Mail account into Outlook application with the help of the following instructions.
- Step 1. Launch Outlook application and click on File tab.
- Step 2. Click on Add Account option to configure your Zoho Mail account.

- Step 3. Enter your email address> go to Advanced options> select Let me set up my account manually option and proceed to Connect option.

- Step 4. Tap on IMAP option, then enter your account password and tap on Connect option.

- Step 5. Your Zoho Mail account has now been successfully configured in the Outlook application.
Part 3: Export Zoho Mail to Outlook PST format
Outlook application allows its users to export its mailbox data into PST format by using its Import/Export utility. To perform this task, adhere to the given instructions carefully.
- Step 1. Open Outlook application and click on File tab.
- Step 2. Go to the Open & Export option, then click on Import/Export.
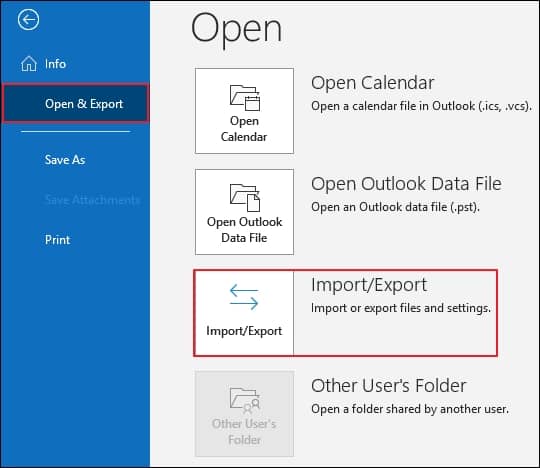
- Step 3. Choose Export to a file option and proceed to Next.

- Step 4. Select Outlook Data File (.pst), then press Next.

- Step 5. Navigate the mailbox folder and click on Next.

- Step 6. Browse to designate a location, choose Options based on your requirements, then proceed to Finish.

- Step 7. Your Zoho Mail data is now successfully saved in PST format in your system.
Method 3: Utilize the Import/Export feature to export mailbox data
Import/Export Emails is the default feature of Zoho Mail, allowing its users to import or export Zoho mailbox data directly to their system. Follow the provided steps carefully to understand its complete functionality.
- Step 1. Access your Zoho Mail account by visiting Zoho.com in your browser.
- Step 2. Go to Settings from the top right corner and then click on Import/Export Emails option.
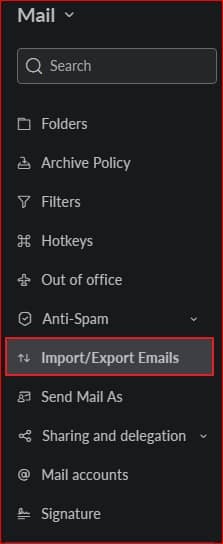
- Step 3. Tap on Export option> Select folder from the drop-down list> choose Export date range> check Include subfolders & Export archive email(s) alone options if needed, then proceed to Export.

- Step 4. You will receive a download link in your email, which is valid for 30 days. Download your mailbox data using that link.
- Step 5. Your mailbox (.zip format) is now successfully downloaded into your system.
- Step 6. Extract the downloaded files in your system. Once done, manually drag and drop them one by one into Outlook application. In this manner, you can add Zoho mail to Outlook successfully.
Conclusion
We have discussed a detailed procedure for exporting data from Zoho Mail to PST format with manual solutions. But performing these solutions might yield different results for users. Hence, utilizing the mentioned tool is preferable for error-free data backup. The tool offers real-time status of backup process that is helpful in tracking the progress.
FAQs
Q- Why is choosing an advanced solution better than a manual one?
Due to the efficient features, advanced solution prevails over the manual ones. Here are some reasons:
- Convert EML, EMLX, MSG, & OFT files of any size & number.
- Save in different output formats like PST, PDF, DOC, DOCX & many others.
- Maintains complete data integrity & hierarchy.
- Advanced filters provide structured data at the desired location.
- User-friendly interface helps even non-technical users to perform file conversions.
Q- How do I export Zoho Mail to Outlook PST free of any error?
With the help of Zoho Mail and Outlook, you can export Zoho Mail to Outlook PST format for free. You need to utilize the Import/Export utility of both application to execute the process.


