5 Simple ways to fix unplayable video error 0xc00d36e5

Published On - June 19, 2024

The video can’t play error displays the “item is unplayable – please reacquire the content. 0xc00d36e5” message. This error prevents users from accessing the content of the video file, which is quite a frustrating experience. Hence, resolving the error is necessary to maintain a smooth workflow for users.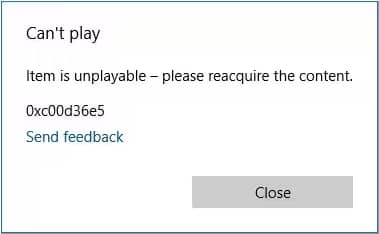
Let’s explore different solutions to overcome it. But before going through these solutions, it is necessary to know the possible reasons behind 0xc00d36e5 video error to identify suitable solutions for this problem.
Possible reasons behind 0xc00d36e5 error
There are several reasons that can cause 0xc00d36e5 error while playing videos. We’ve compiled a comprehensive list of the most significant ones below.
- Incompatible media player
- Virus or malware attack.
- Outdated Graphic Drivers
- Corrupt or damaged video file.
- Corruption in Windows Registry.
- System file configuration problems.
- Corrupt storage drive (e.g., USB and SD card).
- Hindrance created by third-party applications.
- Incomplete download or transfer of video file.
By diligently following the solutions that are mentioned below, you can easily resolve this error and regain the seamless enjoyment of your videos.
One of the most common reasons for the “video can’t play” error is its incompatibility with your current media player. Using another media player, such as VLC, which supports a broad range of video file formats, can resolve this issue.
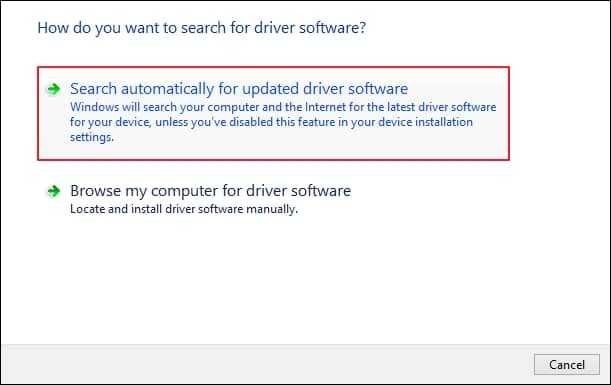
Sometimes outdated graphic drivers can also cause hindrance in playing a video. So, updating graphic drivers can help you to resolve this issue. Follow the given instructions to update them.
- Right-click on start button, then select Device Manager.
- Navigate and expand the Display adapters, right-click on the installed driver, then proceed to Update Driver Software option.

- Click on the Search automatically for updated driver software that will begin the automatic search for the latest driver and install it in your system.
VLC Media player can help you to fix minor errors in the video file. To do so, follow the given steps carefully.
Note: VLC Media Player majorly supports .avi files to remove minor errors. Thus, it’s important to convert your video files into .avi format before beginning the conversion process.
- Access the corrupted file’s location in your system and rename it to .avi file extension.
- Launch the VLC media player, then tap on the Tools option and click on Preferences.

- Go to Inputs/Codecs> Browse your video file> choose Always fix from Damaged or incomplete AVI file section> tap on Save option.
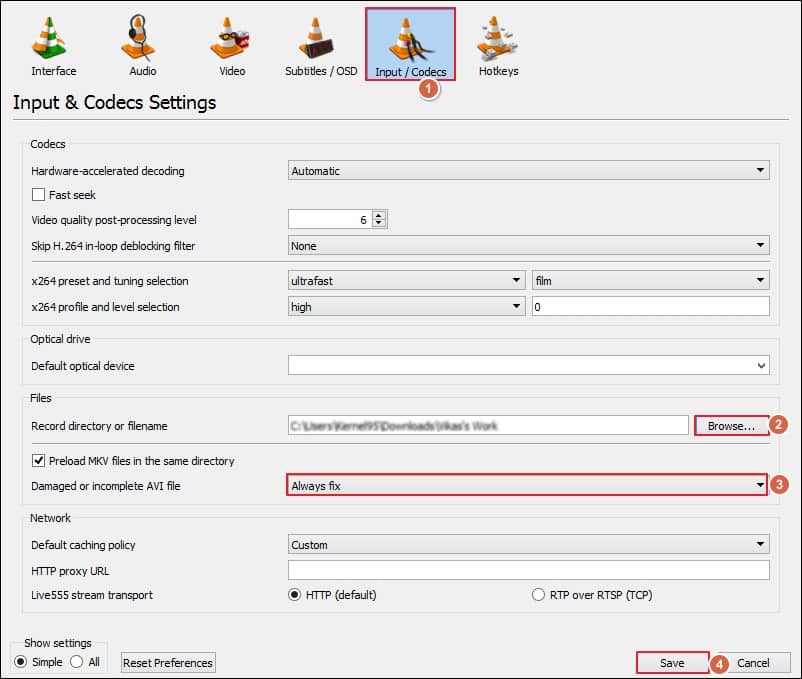
- It will automatically fix the minor errors in your video file.
SFC and DISM are the inbuilt command line of windows that can resolve minor errors related to your system files. You can utilize these command lines to fix the error.
- System File Checker (SFC)
- Type CMD in the home screen search box on your system.
- Click on Run as Administrator option.
- Type sfc /scannow and press Enter key.
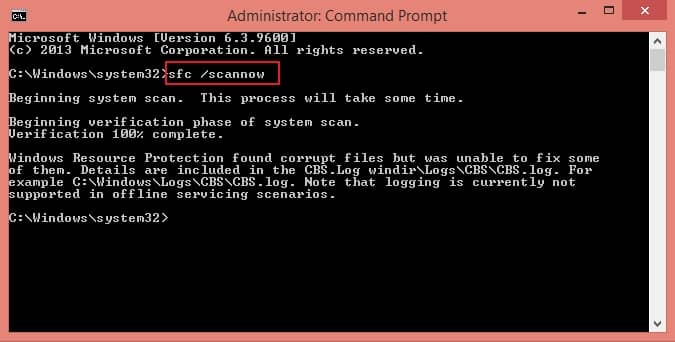
- Restart your system once the scanning and repairing process is complete.
- Deployment Image Servicing and Management (DISM)
- Type CMD in the search box and proceed to Run as Administrator option.
- Type DISM /Online /Cleanup-Image /RestoreHealth and press Enter key.
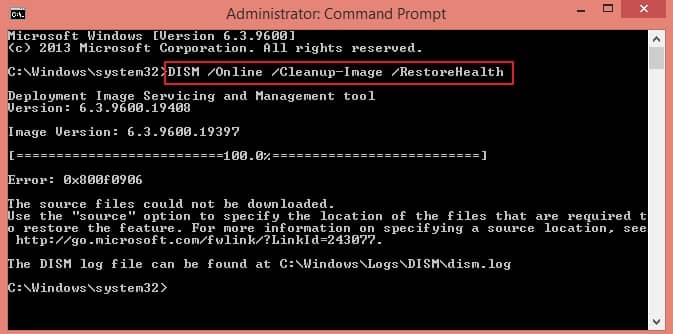
- It will initiate a process that takes over 10 minutes to complete.
- Restart your system and run the SFC command again with the above steps.
The error can also occur due to corruption in your system files. Hence, you can run the SFC command line to repair minor issues in your system. To perform this, follow these steps attentively.
In case the SFC command line didn’t resolve the error, then you can use DISM command line to fix it. To do so, follow the given steps described below.
In certain instances, some third-party applications or advanced settings can cause the video can’t play error in your system. So, to resolve this issue, rebooting your system in safe mode might be helpful. To reboot your system in safe mode, follow the given instructions meticulously.
- Press Windows + I key to access Settings in your system.
- Choose Update & Security and go to Recovery tab.
- Navigate the Advanced startup option under the Recovery tab and tap on Restart option.
- After the successful restart of your PC, a Choose an option screen will open, then select Troubleshoot option.
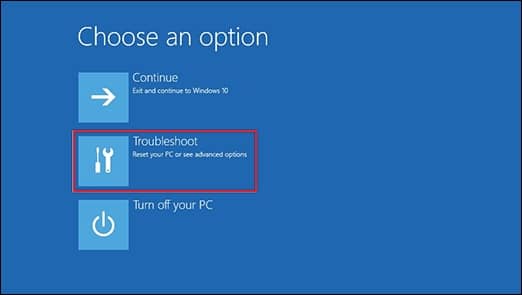
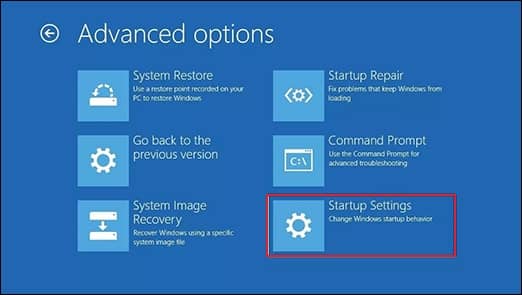
- Click on Advanced options under Troubleshoot section.
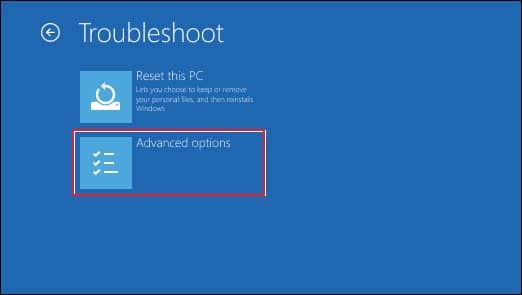
- Under Advanced options, choose Startup Settings.
- Tap on Restart option to access your PC in safe mode.
Note: You may be required to enter your Bitlocker recovery key.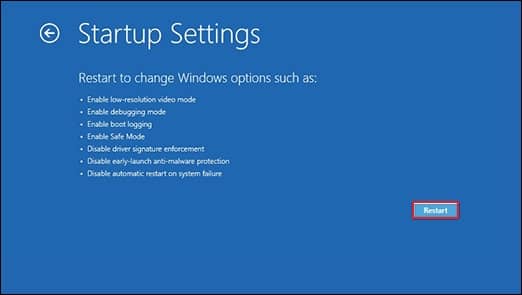
- You will see a list of options on the screen once your system restarts. Choose 4 or press F4 to start your system in safe mode. If you need to access an internet connection in safe mode, then select 5 or press F5.
- Press Windows + R keys> type msconfig in Run window> click on OK.
- Choose Boot tab on the screen.
- Clear the Safe boot checkbox under Boot options to start your system in normal mode.
Note: You can easily exit from Safe Mode just by restarting your system. In case your system is still booting in Safe Mode then follow the below instructions to exit from it.
The above-mentioned methods can help you resolve minor errors in a video file. However, these methods may not be effective in severe video file corruption, which is also a possible reason behind this error. Therefore, opting for an automated tool is the best solution to repair your corrupt or inaccessible video file.
Recoveryfix Video Repair is one such tool, capable of repairing corrupt or damaged video files without disrupting their original form. It not only repairs your videos but also allows you to convert and save them into various formats, including MP4, 3GP, MOV, FLV, and more. Additionally, it can repair corrupt F4V video files instantly.
Wrapping up
We have discussed the potential causes behind the 0xc00d36e5 video error and effective solutions to resolve it. By utilizing the mentioned methods, you will be able to fix your video issues caused by various reasons, including outdated drivers, corruption in the Windows Registry, system file configuration problems, etc.
However, these manual solutions may not be able to resolve severely corrupt or damaged video files. In this case, relying on the discussed professional tool to repair your corrupt or damaged file is the best option. It can also fix videos playing in slow motion issue effortlessly.