How to Delete Multiple Emails in Outlook?

Published On - March 6, 2025
User query: I have been using Outlook since 2014. So, it has hit its size limit now. I am looking to erase multiple emails from it but struggling to find the best methods. Can you help me with this?
For managing the storage space, boosting productivity, & making inbox structured and clutter-free, users often look to delete emails in Outlook. Out of several instances, the most challenging situation is how to delete multiple emails in Outlook while looking to execute the process.
So, be with our expert guidance to know the detailed answers to these queries. Explore the given ways to fulfill your needs.
Important to know: As Outlook.com offers users 15 GB of free space, it is essential to clean your mailbox to avoid odd situations, such as oversized OST files. Moreover, an organized mailbox helps increase efficiency & response time.
How to delete multiple emails in Outlook? [With Scenarios]
Here, we have covered solutions as per the scenarios of the users collected from their queries & reviews. Follow them carefully to get the desired output.
Important to know: Here, we have illustrated the methods to execute the soft deletion process that will be stored in the Deleted Items folder of the Outlook application for future recovery. Press the Shift + ‘Delete’ keys if you want to delete permanently.
Scenario 1. Delete desired email messages from a single folder
This section will provide a stepwise guide on successfully deleting multiple email messages from a single folder. Here, we will use the Ctrl & Shift key to select multiple emails for deletion. Try the steps below:
- For consecutive emails:
Select the 1st email, press the Shift key, and click on the last email to select all the consecutive emails simultaneously. Then click on the Delete key.
- To delete multiple emails but not consecutive:
Select the 1st email, press the Ctrl key & then choose the individual emails. It will select the desired emails that you want to delete. Then, tap on the Delete option.
Scenario 2. Delete all emails at once from a single folder
This section targets users who want to know the answer about how to delete all emails at once from a single folder. Here are the steps to know:
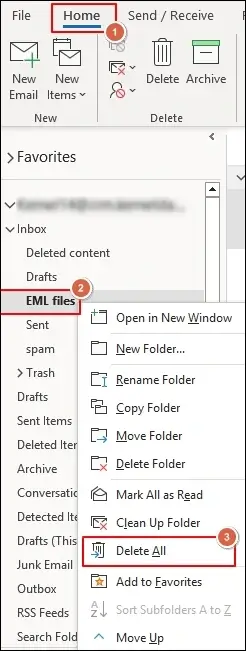
Step 1. Access the Outlook application.
Step 2. Go to the desired folder, right-click on it & click on the Delete All option to delete all emails from a folder.
Scenario 3. Delete bulk emails with date, size, sender filters
This method will be helpful in cases where you want to delete specific emails as per the date, size, & sender. For this, you need to create a grouping of those emails & then delete them from the Outlook application. Let’s start with the steps:
Step 1. Open the Outlook application & click on the Inbox folder.
Step 2. Choose the View tab, select the Arrange by option to arrange the emails as needed, and choose Show in Groups.
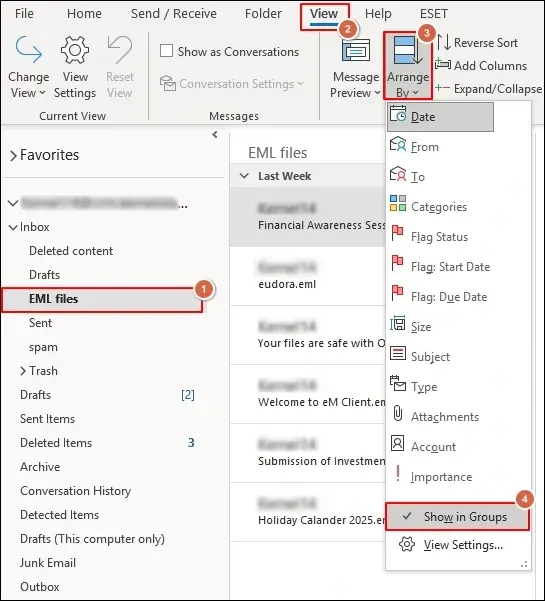
Step 3. It will group them, right-click on the header, choose the Delete option to delete them, and click on the OK option to confirm it.
Scenario 4. Clean up folders/subfolders/conversation directly
Outlook Desktop versions come with a Clean Up utility that allows users to clean their folders instantly. Let’s understand its functionality with the steps in detail:
Step 1. Launch the Outlook application & choose the desired folders.
Step 2. Go to the Home tab and tap on the Clean Up icon from the ribbon section. Choose the Clean Up conversation, Clean Up Folder, Clean Up Folder & Subfolder as per your requirement.
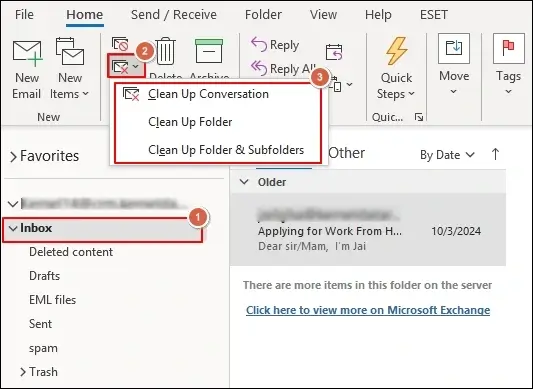
It will also move the emails from your folder to the Deleted Items folder.
Scenario 5. Deleted multiple emails in Outlook 365
Till now, we have addressed how to delete multiple emails in Outlook app. This section will help you know how to delete multiple emails in Outlook 365. For Outlook on the web, users can use methods as per scenarios 1 & 2 to execute the deletion process.
Besides that, there is another method in which users can create a set of rules to automate the deletion process.
Remember, when this rule starts working, emails from the selected user will automatically be deleted.
Follow the below steps to create the set of rules & make the deletion process automatic in Outlook 365:
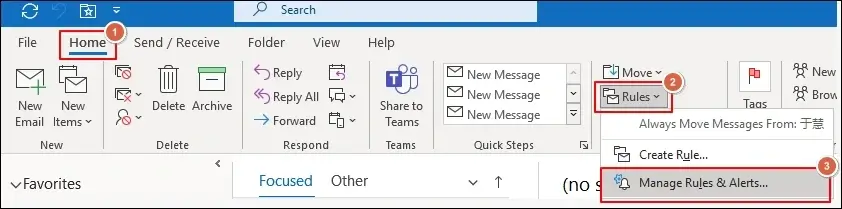
Step 1. Access Outlook 365 with the required credentials. In the Home section, go to the Rules tab, and select the Manage Rules & Alerts option.
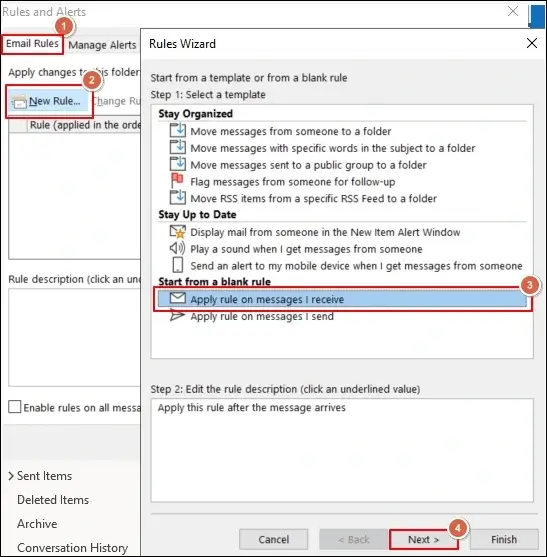
Step 2. Choose the Email Rules in the next section, click on the New rule, & tap on Apply rule on messages|receive. Then, hit on the Next option.
Step 3. Under the Rules Wizard, choose the from people or public group checkbox, then select the desired email address. Click on the Next option.

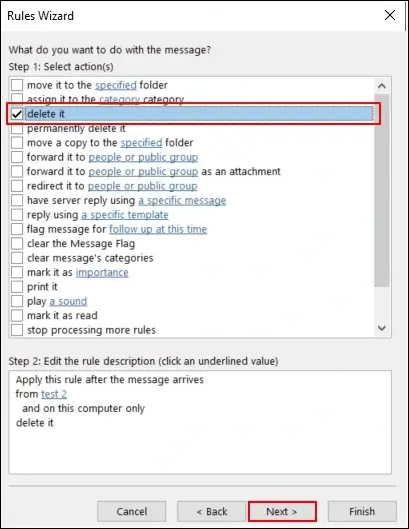
Step 4. Choose the Delete it option from the next wizard. Tap on the Next option.
Step 5. Choose Run this rule now on messages already in “Inbox” checkbox, Turn on this rule, and select the Finish option to complete the process.
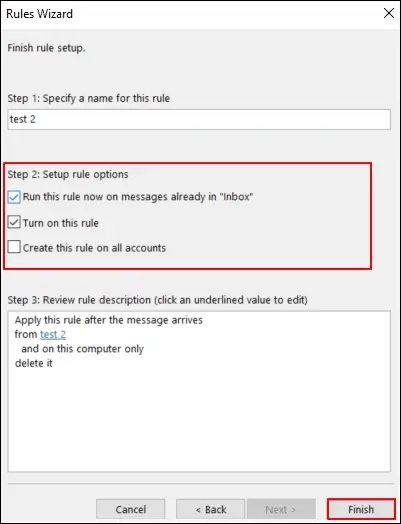
Note: It will delete the messages permanently. So, choose carefully.
Is deleting the emails the only option to manage the storage space?
Although it is the user’s choice to manage their storage space, there can be other aspects too beside executing the delete emails in Outlook process.
If you need your deleted data in the future, how will you retrieve it? As data plays a crucial role in every organization, losing data might create challenging situations.
So, instead of deleting email messages, experts always recommend backing them up. You can go with any of the approaches for backup, be it manual or advanced.
But choosing the advanced OST converter over manual ones stands out as the best in most cases. As per the professionals’ recommendations & high-rated reviews, Recoveryfix OST Converter is considered the first choice for executing the backup process.

It converts all the OST data in the desired format at the user-defined location with complete integrity. With this advanced tool’s filters, users get the structured data into the local system as needed.
Final takeaways
While going through all the above discussions, we have come up with the following takeaways: if you are concerned with managing the storage space by just deleting them, go with the discussed manual methods.
Otherwise, choose the advanced OST converter to access both facilities, effective storage management & its future accessibility.