How to export Salesforce report to excel? – A Complete Guide

Updated On - March 27, 2025
Salesforce is a leading platform to manage customer data, sales, and business insights. However, many users prefer exporting Salesforce report to Excel for better data analysis and modification.
Also, Excel provides offline access, customized formatting, advanced calculations and greater flexibility that Salesforce reports alone may not provide to the users.
So, the guide walks you through multiple methods to export Salesforce reports to Excel and troubleshoot common issues.
Why users export Salesforce report to Excel? – Top reasons
Businesses often export report from Salesforce to Excel for data analysis and other purposes. Below, we have provided some key reasons:
- Allows users to apply formulas, pivot tables, and conditional formatting for deeper insights.
- Customize data reports as per user’s specific needs and make them readily available.
- Access critical reports even without an internet connection and acts as a secure backup.
- Combine multiple Salesforce reports with other data sources for complete business analysis.
- Share Excel reports easily via emails, cloud storage, or print them for team discussions.
- Easily opens large datasets for extensive data analysis and avoids slow-down issues in Salesforce.
- Helps in keeping records, perform compliance checks, and conduct financial audits for all the exported reports with ease.
How to export Salesforce report to Excel using different manual solutions?
Salesforce provides various options to export reports based on user preferences, data volume, and export frequency. Here, we have listed the most effective methods to export report from Salesforce to Excel.
Solution 1: Standard way to export via Salesforce Reports tab
Salesforce allows you to export reports directly from the Reports tab. Here’s the complete process to execute the Salesforce export report to Excel:
- For Salesforce Classic
Follow the given steps to export data from Salesforce to Excel in the classic version.
Step 1. Visit Salesforce.com to access your account.
Step 2. Navigate to the Reports tab and click on the Export option under Action.

Step 3. Choose the suitable Export File Encoding and select Excel Format.xls to Export reports.
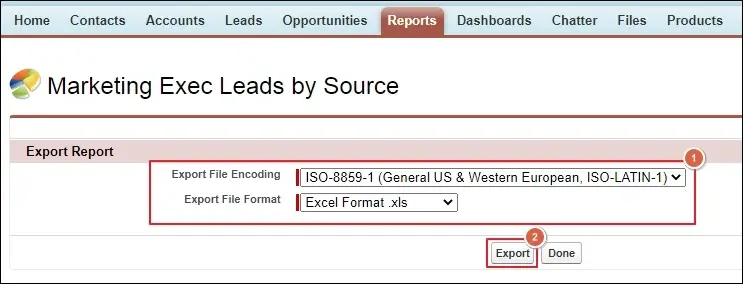
Step 4. It will download the report to your system drive.
- For Salesforce Lightning
Here’s how to export reports from Salesforce in the lightning version.
Step 1. Go to the Reports tab in Salesforce.
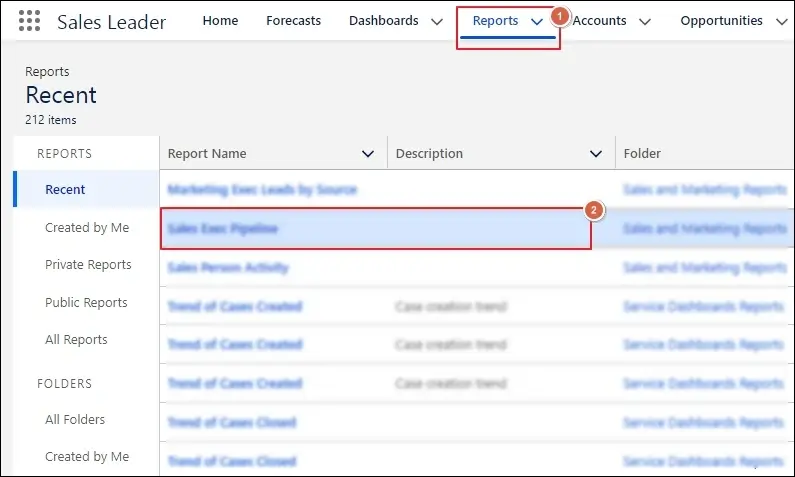
Step 2. Open the report you want to export.
Step 3. Click on the dropdown arrow within the report and select Export.
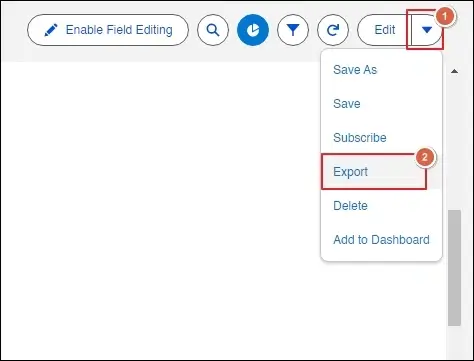
Step 4. Select the suitable Export View option, then choose Excel Format.xlsx and proceed to Export.
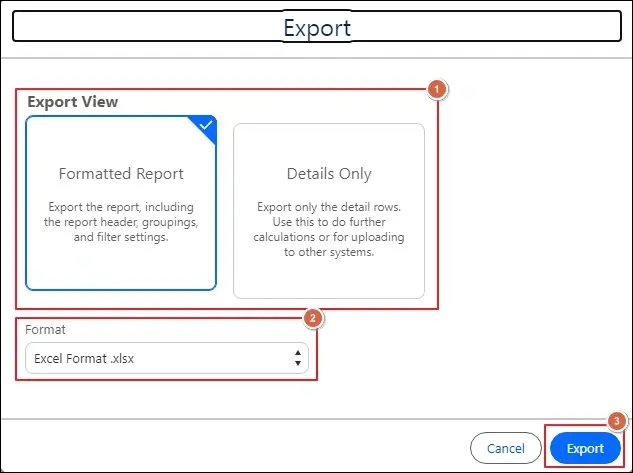
Step 5. You have successfully downloaded Salesforce reports.
This method works well for small to medium-sized reports that don’t require automation. The steps remain nearly similar in both versions, but Lightning has a more simplified UI for easier navigation.
Solution 2: Use Salesforce Data Export tool for bulk reports
Salesforce Data Export tool is the best option for exporting large datasets or multiple reports in Excel format.
- Schedule and export all data from Salesforce
You can schedule Salesforce reports to send via email in Excel format:
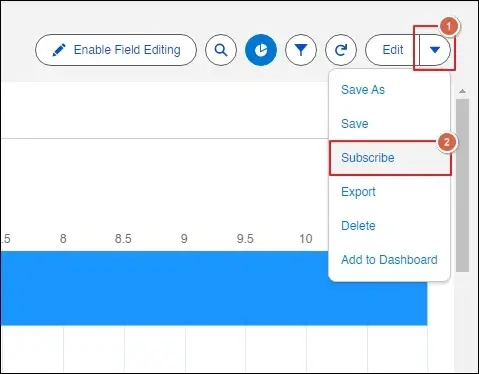
Step 1. Open the report, use the drop-down arrow to access more actions and click Subscribe.
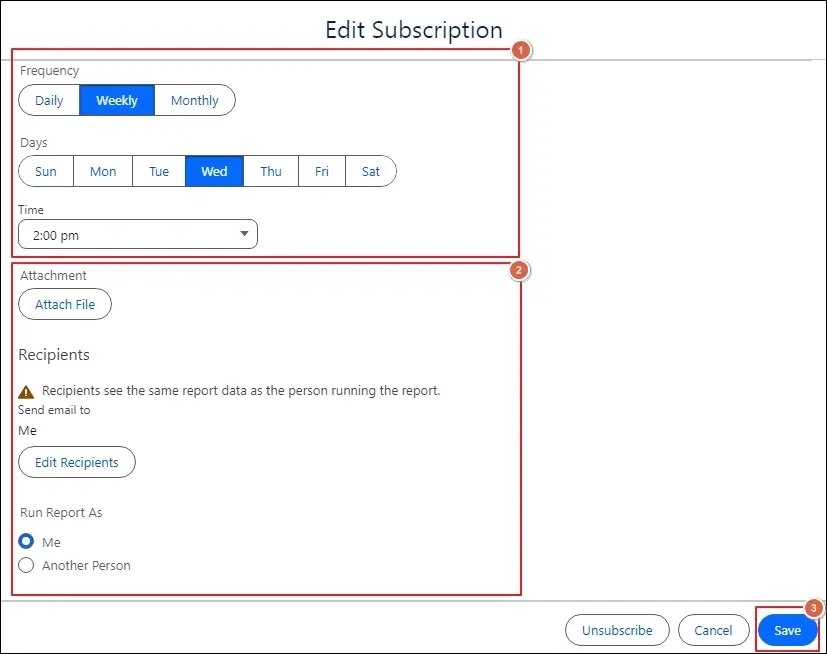
Step 2. Set the Frequency > Days > Time as needed. Then, Attach File if required, add Recipients, and choose the appropriate Run Report As option. Add Conditions to the report if you want and proceed to Save.
Step 3. It will automate the export process as per the set schedule.
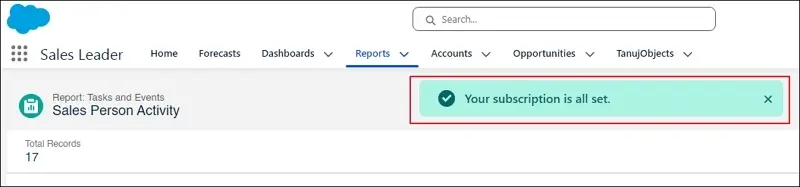
Step 4. You will receive a download link in your email on the scheduled date.
- Export selected data from Salesforce
Here are the detailed steps of the Salesforce report export to Excel process.
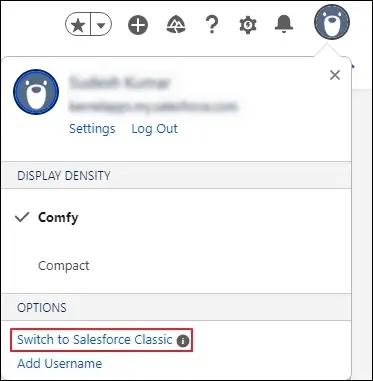
Step 1. Switch to Salesforce Classic and proceed.
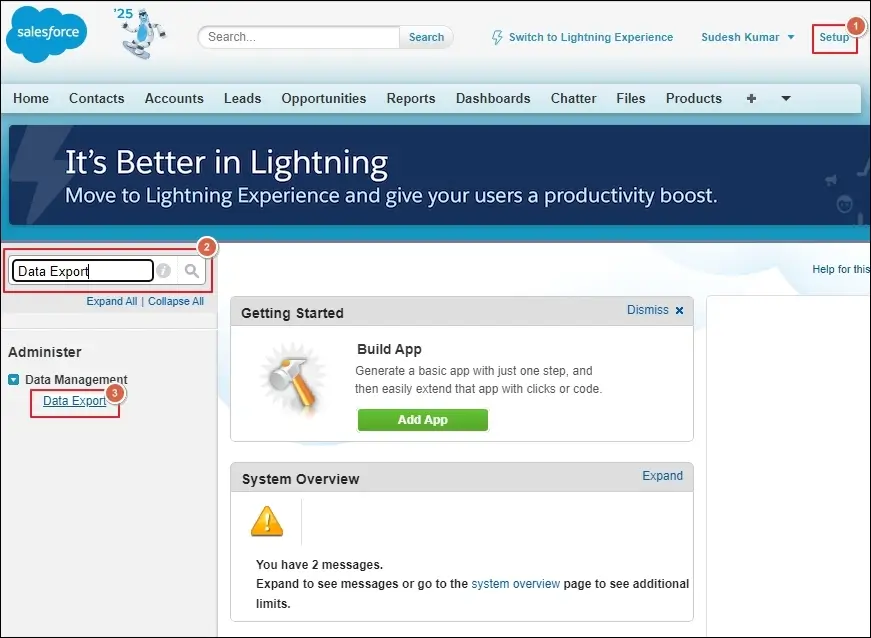
Step 2. Go to Setup and Search for Data Export.
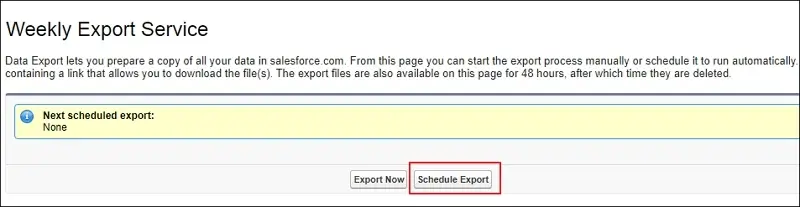
Step 3. Choose Schedule Export option for large datasets.
Note: You can also use Export Now option to get reports immediately.
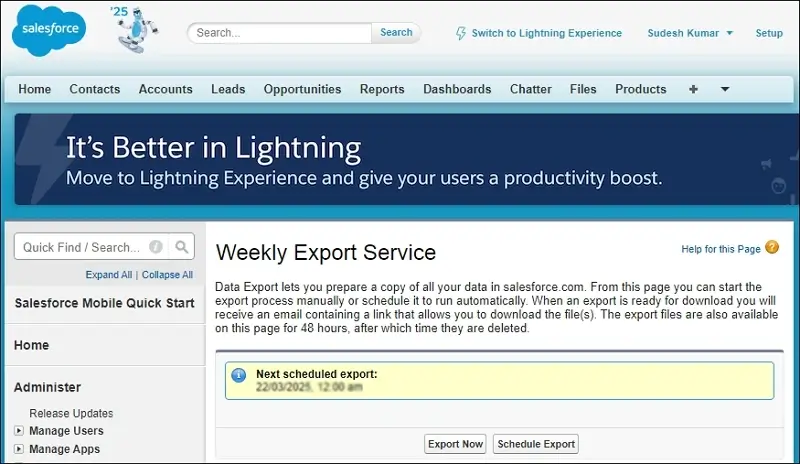
Step 4. Fill in all the relevant details at your convenience. You can check out the screenshot below for any further assistance.

Step 5. You will receive a download link in your email on the scheduled Export date.
Solution 3: Advanced solutions to export Salesforce report – For Developers
The above methods are more than enough to export your reports from Salesforce. But if you want more customization and specific data export, then you can go with the advanced solutions.
- Export Salesforce Reports using Representational State Transfer (REST) API
REST API is a web interface that allows users to perform different operations without using Salesforce UI. Users can create, manipulate, search data, or even integrate Salesforce into applications by sending HTTP requests.
You can access and operate specific information by sending the API request to different endpoints of Salesforce, also known as resources. These resources contain records, query results, metadata, and many more.
Follow the given steps to export data using REST API
Points to be remembered:- Ensure the Salesforce API limits before using the given method.
- Use Bulk API to extract large data sets efficiently.
- Avoid potential issues by implementing proper code error measures.
- Users may need to convert the extracted data to their desired format.
Step 1. Create a connected app in Salesforce to access the API. The app contains Client ID and Client Secret for authentication.
Step 2. Select a tool or programming language to interact with Salesforce Rest API.
Step 3. Get the access token by using Client ID and Client secret.
Step 4. You will get the endpoint of the access token.
https://login.Salesforce.com/services/oauth2/tokenNote: Replace login with test if you want to connect with Sandbox.
Step 5. Retrieve data by using the suitable Salesforce REST API endpoints.
Step 6. Filter and retrieve data as needed by running Salesforce Object Query Language.
Step 7. Make sure to include Authorization header along with the access token in API requests.
- Export Salesforce Reports Using an Apex programming language
Apex is a programming language created for Salesforce users. It helps developers to manage data, automate tasks, and create custom applications within the Salesforce platform. You can extract reports by writing code that collects report data and saves it in formats like .csv or .xls. It allows users to automate the process and access reports more easily.
Following the given steps carefully to extract reports using Apex.
Points to be remembered:- Make sure you have the Report ID before writing the Apex code.
- You must have Administrator or Developer permissions to run Apex.
Step 1. Click on your profile picture to access the Developer Console.
Step 2. A new window will open. You can write your Apex code here.
Step 3. Go to File > New > Apex Class in the Developer Console.
Step 4. Name the Apex class. For example, ExportReport
Step 5. Paste the given code:
public class ExportReport {
public static void getReportData() {
// Replace ’00O5g000008VJxE’ with your actual Report ID
String reportId = ’00O5g000008VJxE’;
String endpoint = ‘/services/data/v57.0/analytics/reports/’ + reportId + ‘?includeDetails=true’;// Call the API to get report data
Http http = new Http();
HttpRequest request = new HttpRequest();
request.setEndpoint(URL.getSalesforceBaseUrl().toExternalForm() + endpoint);
request.setMethod(‘GET’);
request.setHeader(‘Authorization’, ‘Bearer ‘ + UserInfo.getSessionId());HttpResponse response = http.send(request);
if (response.getStatusCode() == 200) {
System.debug(‘Report Data: ‘ + response.getBody());
} else {
System.debug(‘Error: ‘ + response.getStatusCode() + ‘ ‘ + response.getBody());
}
}
}Step 6. Navigate to Debug under the Developer Console and Open Execute Anonymous Window.
Step 7. Type the given command and click Execute.
ExportReport.getReportData():
Step 8. Access the Logs tab to view the report data in JSON format.
Step 9. Use the given command to process the JSON response and convert it to CSV format.
public class ExportReportCSV {
public static void convertToCSV() {
// Dummy JSON response (Replace with actual report JSON)
String jsonResponse = ‘{“reportData”:[{“Name”:”John Doe”,”Email”:”john@example.com”},{“Name”:”Jane Smith”,”Email”:”jane@example.com”}]}’;
Map
ListString csvData = ‘Name,Email\n’; // Header
for (Map
csvData += record.get(‘Name’) + ‘,’ + record.get(‘Email’) + ‘\n’;
}System.debug(csvData); // Output CSV data
}
}Step 10. You can manually export data into Excel or use a script to automate it.
Salesforce Export issues: Common fixes!
Although users can export their reports from the provided solutions, sometimes they might face common issues while performing them. So, use the given solutions to fix them instantly.
- No Export Option in Salesforce Report
- Make sure you have the necessary permissions to export Salesforce report.
- Take assistance from your Salesforce admin to enable export settings.
- Data Formatting Issues in Excel
- Use the Text to Columns feature in Excel to fix the misaligned data.
- Select UTF-8 encoding during the export process to prevent special character issues.
- Salesforce Export Limits and their Resolves
- Salesforce restrict users from exporting reports beyond a specific record limit.
- Try the following solutions if your report exceeds the limit:
- Split reports into smaller segments.
- Use SOQL queries for extracting particular data.
These simple steps will help you resolve common errors while exporting your Salesforce reports. But you can easily avoid all these errors by choosing professional solutions like Recoveryfix Salesforce Backup and Restore. It simplifies the entire process and allows users to export Salesforce leads, reports or even contacts in a few clicks.

Implement These Best Practices and Save More Time!
Follow the tips given to export Salesforce report to Excel more efficiently.
- Export only the required data to reduce processing time.
- Use CSV Format for faster data loading and wider platform compatibility.
- Leverage pivot tables in Excel analyze the exported data effectively.
- Protect sensitive information of customers by using the best security practices.
Closing Remarks
The blog contains manual export solutions, automated scheduled reports, or custom Apex scripts for bulk extraction to gain more control over your data.
You can efficiently export Salesforce reports to Excel by following these steps and best practices. If you face difficulty while exporting reports to Excel, then opt for the recommended solution.
The Salesforce Data backup tool will help you quickly save the data to your desired location.
People also ask for
Q1- Why can’t I download Salesforce report to Excel?
Check your export permissions, file formats, and Salesforce account settings to resolve the issue and start downloading your reports in Excel format.
Q2- Can I export Salesforce report to Excel automatically?
Yes, you can automate exporting Salesforce reports to Excel by using scheduled reports, automation scripts, or third-party tools like Recoveryfix Salesforce utility to simplify data extraction.
Q3- How to export Salesforce opportunities to Excel?
You can use standard export options, reports, or data loader tools to export Salesforce opportunities in Excel for structured data analysis and reporting.
Q4- Is there a way to export Salesforce report to Google Sheets?
Yes, you can export Salesforce reports directly to Google Sheets by using third-party integrations, add-ons, or Salesforce Data Connector to sync data for real-time reporting.
Q5- What is Salesforce export report permission, and how do I get it?
Salesforce export permission allows admins to grant users access to export reports. Admins can grant this permission from profile settings or permission sets for access.
Q6- How to export report from Salesforce without admin access?
You need specific user permissions or alternative methods like sharing reports via email to retrieve Salesforce data without Admin access.
Q7- How does Salesforce export to Excel from list view work?
You can use the “Export” option in the list view to download selected records directly into an Excel file for better data organization and analysis.
Q8- How to export data from Salesforce into Excel using Apex?
Go to the Developer Console in Salesforce to run the specific Apex commands for exporting data.