Gmail email client is known for its extensive, advanced & versatile features that fulfill all the users’ needs for effective email communication. Due to its advanced filters, strengthened security, smart replies, & many others, a large section of users opts for this email client for personal and professional use.
So, at times, due to business or personal reasons and to consolidate the information in one place, users look to import mail from Gmail to Gmail. If you are here with the same intention, you will find all your answers through this blog. Be patient & delve into this comprehensive guide to accomplish this task effectively.
Why do users look to migrate emails from Gmail to Gmail?
Since performing this Gmail to Gmail transfer is outside the regular practice among users, some significant reasons can compel the users to perform the operation. Here, we will provide some basic or common ones:
- Looking to manage the storage space of email addresses.
- You have decided to switch to Google Workspace from your personal Gmail account.
- You have created a new Gmail account & are looking to import contacts from Gmail to Gmail.
- You are looking to transfer contacts from Gmail to Gmail due to organizational changes in your business.
- You want to use the new Gmail address rather than the older one without losing its mailbox content.
Methods to execute Gmail to Gmail transfer
After extensive research and testing about the topic, we have found two best possible methods to access or migrate emails from one Gmail account to another. Follow the instructions provided to get successful results.
Solution 1. Use the Google Takeout service
One basic approach to accomplishing the task is to use Google Takeout, also known as Download Your Data. It facilitates users of Google products such as Gmail with the facility to export their data in an archive file that can be downloaded easily. Further, you can access the emails of the source Gmail account in the destination Gmail account using the Thunderbird application.
Here, we will explain the detailed steps for executing this task for your better understanding.
Step 1. Go to the Google Takeout page, tap the Deselect All option, and click Mail to export emails exclusively. Then, hit the Next option.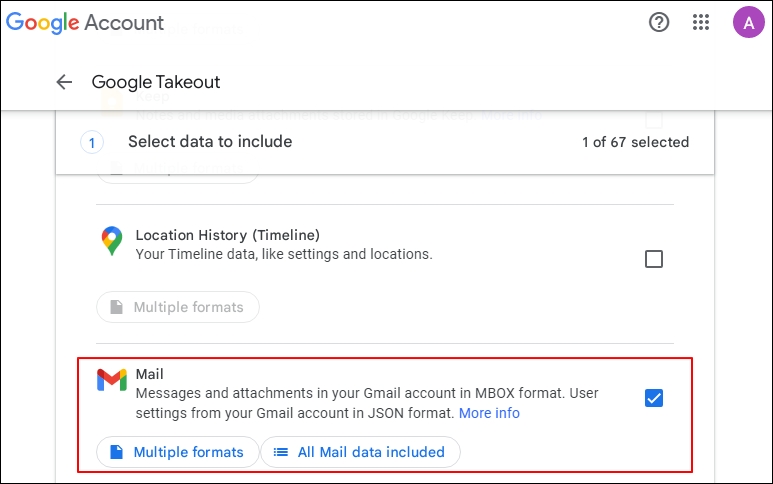
Step 2. On the next page, select the Send download link via email option. You also have other options to choose the transfer medium for sending emails to the destination.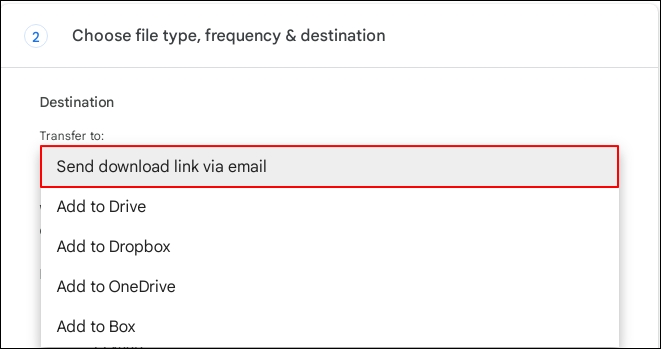
Step 3. Click on the Export Once in the Frequency section, select .zip as the File type & size accordingly. Finally, click on the Create export option to send the request.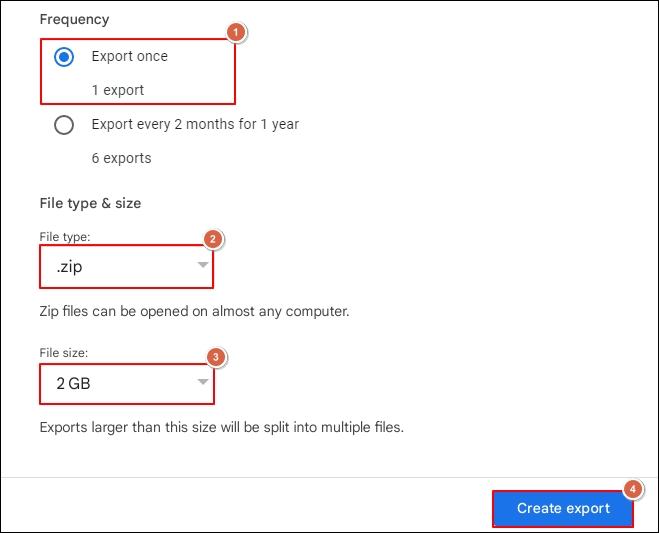
Step 4. Wait for a while till you get the link. Once you get the link to that file through email, download it on your local system.
Step 5. Import this file into your new Gmail account using the Thunderbird application.
Step 6. To execute this, configure your Gmail account in the Thunderbird application and ensure that the Import Export Tools add-on is installed before proceeding.
Step 7. Access the Thunderbird application, go to the top right corner, click on the three dots & select Tools option.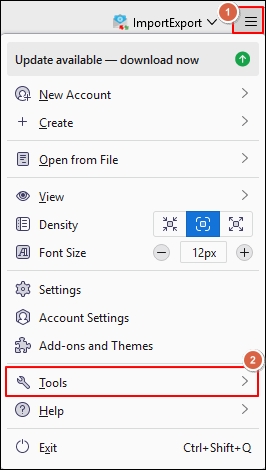
Step 8. Click on the Import option in the next section.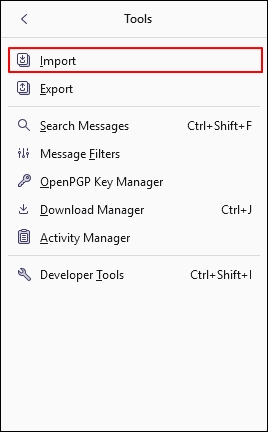
Step 9. In the Import tool section, select Import from a file option & click on the Continue option.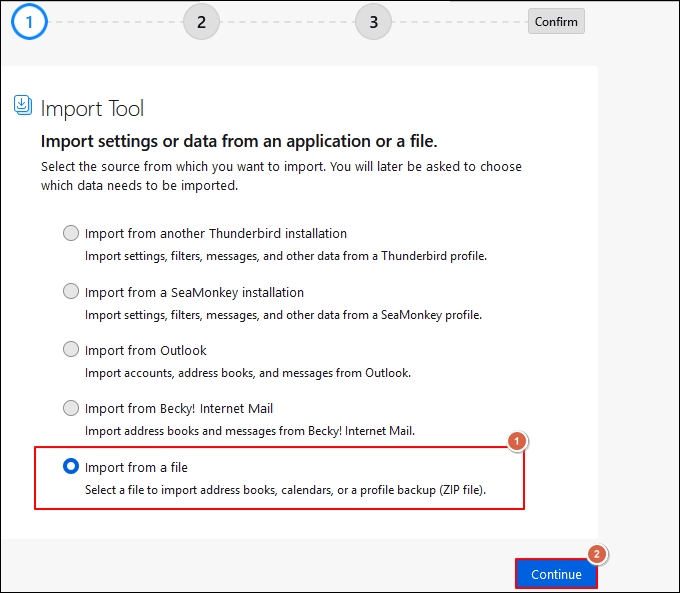
Step 10. Choose Import Backed-up Profile option & tap on the Continue option.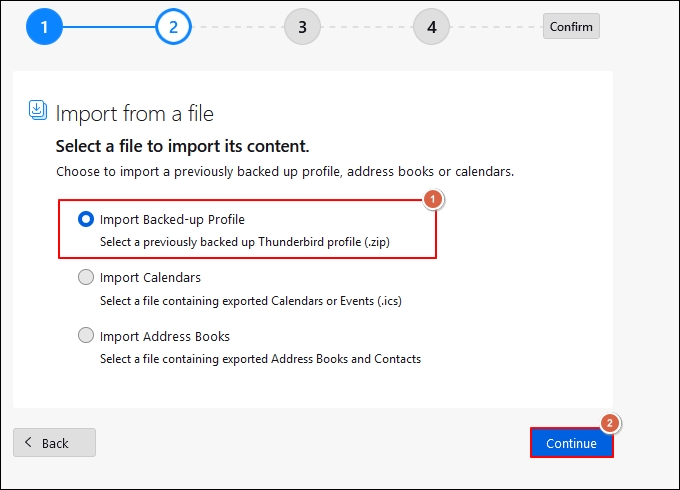
Step 11. Choose what to import & select Continue option.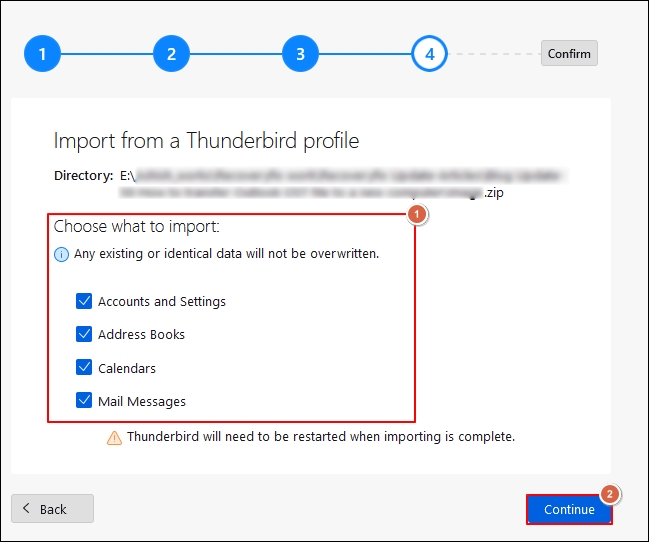
Step 12. Finally, click on the Start Import option to initate the importing Gmail to Gmail process.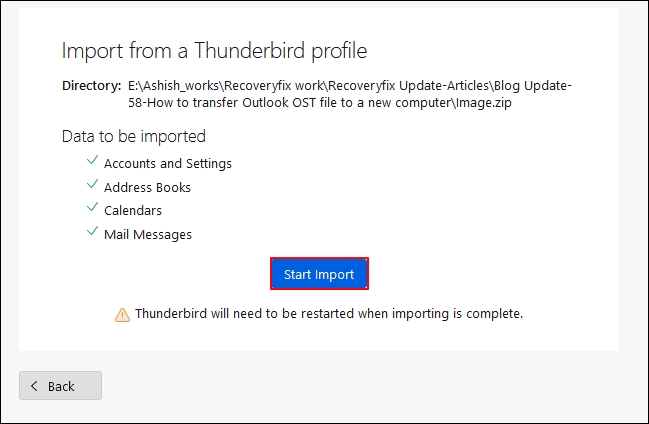
Solution 2. By using the components of Gmail Settings
You can get successful results with the above method. However, you may have to wait days to get the link, which can delay your work. Here is another method in which we will use Gmail settings that provide you results in less time than the previous one. Let’s delve into the discussion about the functionality of this utility in detail:
Change the settings of the source Gmail account:
Perform the following changes in your source Gmail account to prepare it for the Gmail to Gmail migration.
Step 1. Sign into your Gmail account, click on the Settings icon at the top right corner, and tap on the See all settings option.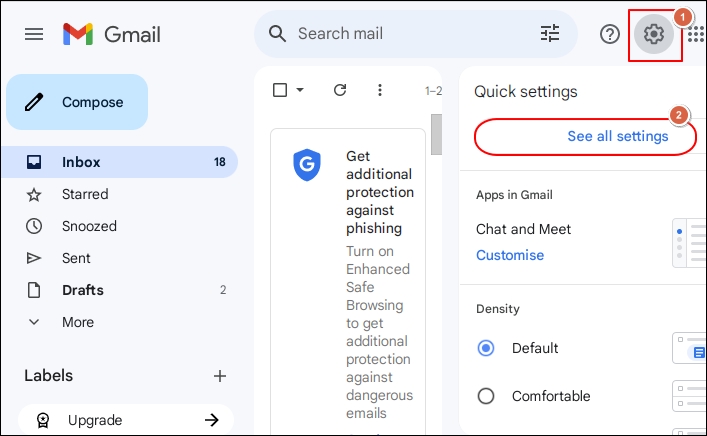
Step 2. Click on the Forwarding POP/IMAP option, check Enable POP for all mail, and select the Keep Gmail’s copy in the Inbox from When messages are accessed with the POP option. Then, click on the Save Changes option.
Follow the steps at the destination Gmail account:
After changing in the source Gmail account, go with the following steps in the destination Gmail account to complete the importing Gmail to Gmail process.
Step 1. Log in to your Gmail account & follow the same steps till See all settings.
Step 2. Click on the Accounts and Import option and go to the Add a Mail account option.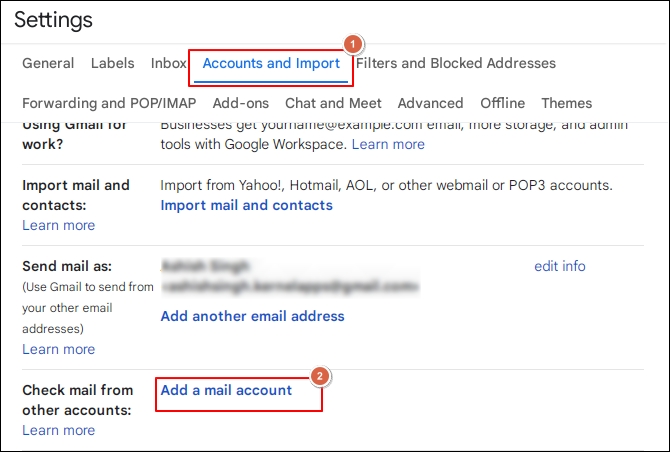
Step 3. Enter the Password & click on the Add Account option. Once the account is added, go to Manage Google Account in the security options.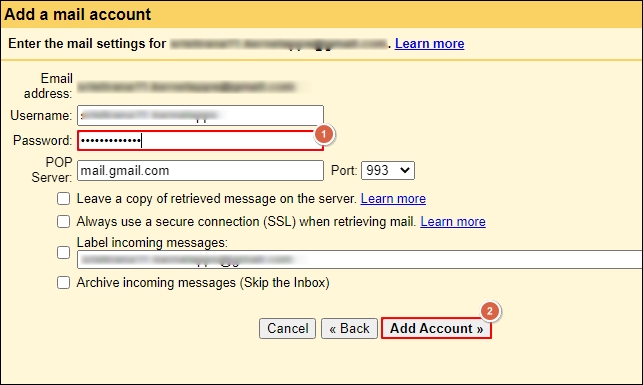
Step 4. On the next page, select Mail from the list.
Step 5. Click on “Yes, I want to send mail as prs@Gmail.com” and tap on the “Next Step” option.
Step 6. Now, complete the verification of your email, which will send a confirmation mail to both the source and destination Gmail accounts. Further, click on the Link to Proceed option and tap on the Confirm option.
Step 7. Wait for a while till your process is in progress. Once the process is completed, you can access your source emails.
Note: You can also perform one additional method to accomplish this task. To initiate the process, select the emails that you want to migrate, right-click on them, and choose the Forward as attachment option. With this process, you can access the emails of the source Gmail account through the specific email but not in your Inbox folder.
What alternate method can be used to make the migration quick or error-free?
Executing a Gmail to Gmail transfer manually can yield positive rewards, but certain limitations prevent you from fully utilizing the Gmail functionalities. Performing limitless, specific migration cannot be possible using manual methods. Additionally, they are tedious to perform & won’t ensure your data security. Hence, experts or professionals recommend that for safe & secure Gmail migration, you need to prefer an advanced IMAP Migration tool. It protects you from experiencing these issues and enriches you with additional features that make your migration structured or errorless.
Recoveryfix Migration for IMAP is a reliable tool that stands out in this category due to its top-notch facilities. It allows users to migrate emails from Gmail to Gmail quickly of any size or number. Its advanced filters, like incremental migration, reduce data redundancy in the Output results. It not only helps in Gmail migration but also allows users to perform other IMAP migrations, such as MDaemon to Office 365.
Conclusion
We hope our expert guide about the Gmail-to-Gmail migration helped you to understand the topic in detail. The provided solutions might have helped you to execute the migration successfully. However, if you want to make the process instant or straightforward without external or internal disturbance, you can use the recommended automated approach. For a hands-on experience, check out its trial version.


