Audio Video Interleave, also known as AVI, is a multimedia container format developed by Microsoft in 1992 under its Video for Windows software. AVI file format stores both audio and video, which allows synchronous audio-with-video playback. Its smooth alignment of audio, video, and file size makes it a preferable format for promos, short videos, advertisements, etc. It is one of the most compatible video files that can be accessed on multiple platforms easily without any specific hardware or software.
Sometimes, we’ve all had the experience of our video files not working correctly as initially. It can happen for many reasons, but in most cases, AVI file corruption is due to mismanagement.
Are you also facing the error “Windows Media Player encountered a problem while playing the file” or any other error like this? In this blog, we will provide complete knowledge about how you can fix corrupted AVI files through a step-by-step approach. Let’s delve into the discussion to learn more.
What are the reasons that create the need to fix AVI file?
Understanding the reason behind the corruption means you can avoid those instances in the future & helps you to repair the AVI file. Let’s see the reasons below:
- Sudden power failure
- Bad sectors on a hard drive
- Electromagnetic interference
- Incomplete download
- Improper transfer of files
- Broken or missing index
- Glitch in Torrent
- Virus or malware attacks
- Technical glitches during the video making
Here we’ve listed some of the most known reasons behind the AVI video file corruption. So, if you feel there might’ve been some fault during downloading or transferring of the file, you can retry anytime and check if that solves your issue. If that doesn’t help, then keep on reading this blog.
Essential tips before dealing with a damaged AVI file repair process
It is always beneficial to check all the basic workarounds that users usually miss and start looking for other AVI video repair methods. Therefore, before indulging in the detailed methods to fix corrupted AVI files, here are some essential tips that you should try as you see this error.
- Download the AVI file again from a trusted or reliable source.
- Ensure your internet connectivity should be better while downloading the video files.
- Try to update the system drivers with the latest versions to reduce the chances of corruption.
- Check the status of your storage to see if it is in good condition or not.
Best manual methods to repair corrupted AVI files
If essential tips don’t work after applying them, try some practical approaches to fix AVI video files. To get satisfactory results, follow the methods mentioned carefully. Let’s now discuss how we can try to repair AVI video files.
Solution 1. Try to fix AVI file
When it comes to minor corruption, VLC media player can give apt results. VLC media player is a popular media player program known for providing numerous advanced features along with playing video and audio files efficiently. These versatile features help users to recover AVI files. Let’s use this free AVI repair tool to repair damaged AVI files.
Step 1. Launch VLC media player, click on the Tools option & select Preferences.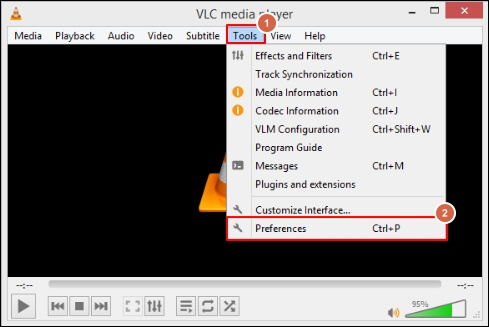
Step 2. Click on the Input / Codecs, search for Damaged or incomplete AVI file and from the drop-down box, select Always Fix option. Finally, click on the Save option to initiate the repairing process.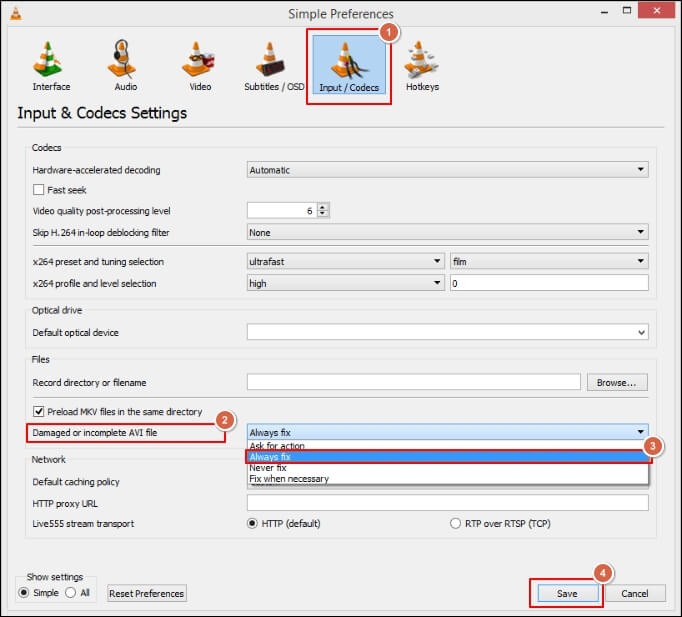
Solution 2. Convert the video format
If fixing the video format does not help you, try to change the format that supports your local video player. Using the same video player for a long time with the same video file format may induce some technical glitches for another file format. Do change the video file format & check whether you can access your video file as earlier. You can execute this process by taking the help of a free AVI repair tool like the VLC media player.
Here, we will provide VLC media player functionality to perform this task.
Step 1. Access the VLC media player and click on the Media > Convert/Save option. 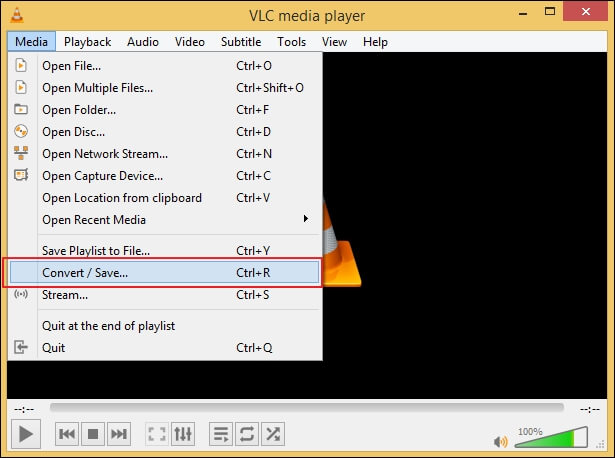
Step 2. Now, in the File section, Add the desired file & click on the Convert/Save option.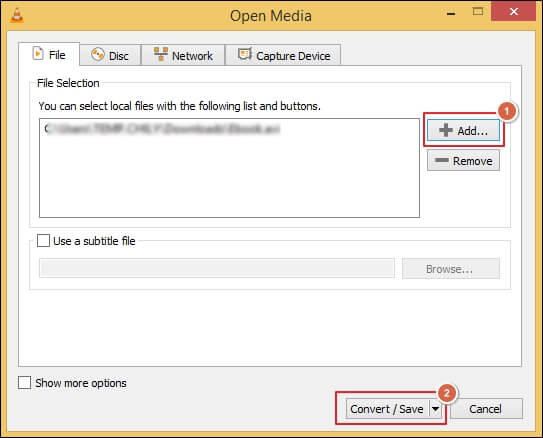
Step 3. Choose the Profile according to your suitability, Browse the destination, and click on the Start option. Wait for a while until your video file is converted. Then, check whether you can play it.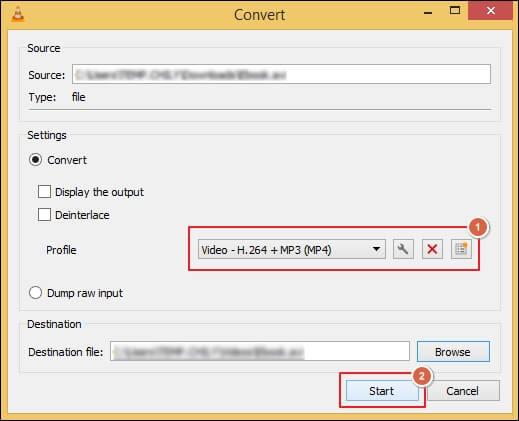
Using advanced software to speed up the AVI repair process
Manual methods can be helpful to fix corrupted AVI files when they are going with the minor issues. However, they won’t guarantee 100% successful results. They can’t assure you about the data security & its intactness. Additionally, if the error is severe corruption, then these manual methods may not be fruitful enough to give you the desired results. Hence, choosing the automated Video Repair tool will be the favorable option to avoid further disturbances.
You can use the Recoveryfix Video Repair tool, one of the professionals’ most recommended or used advanced software. It is an automated video repair tool that repairs video files irrespective of corruption level or file size limitation. Its advanced algorithms support all type of video format, including AVI, MKV, WMV, etc. Let’s see how the tool works:
- First, download and launch the tool safely on your system.
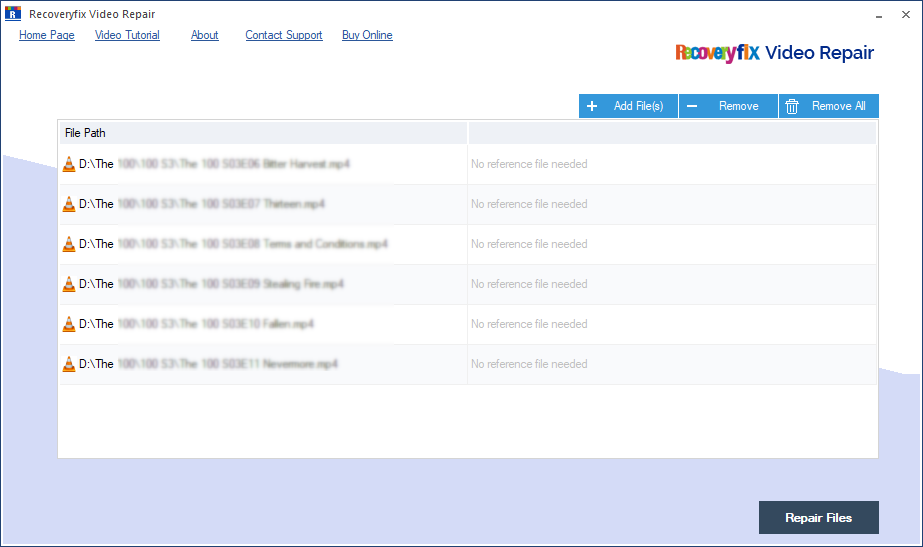
- Now in the home screen, click on the Add File(s) option to add the AVI file(s).

- Add either a single file or multiple files from where they are saved on your system. Select the file(s) and click on Open to add them.
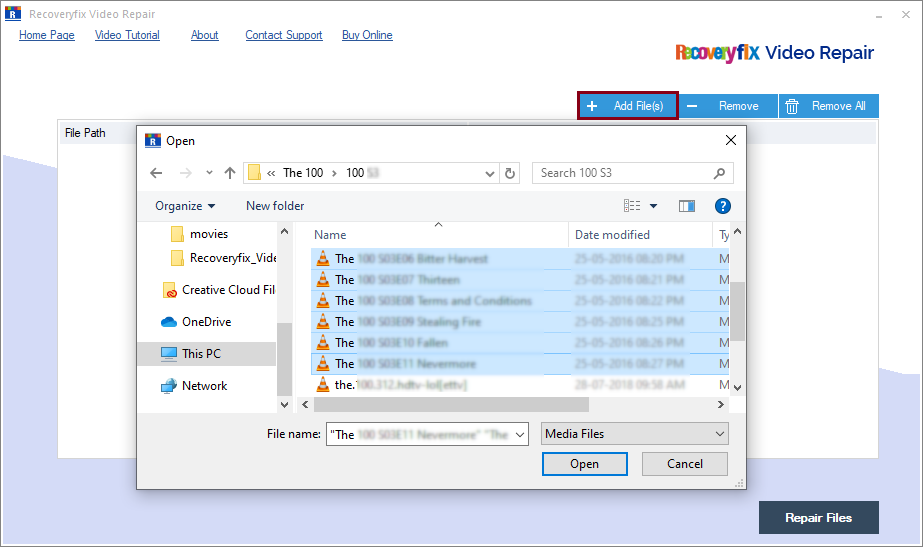
- Review the files you’ve selected and click on the Repair Files option to proceed.
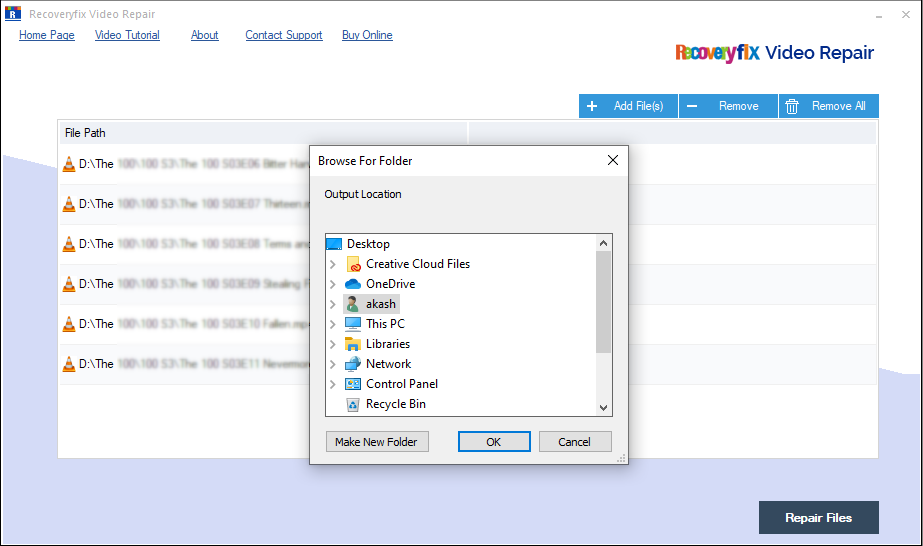
- Browse the location (on your system or an external drive) and click on OK to finish.
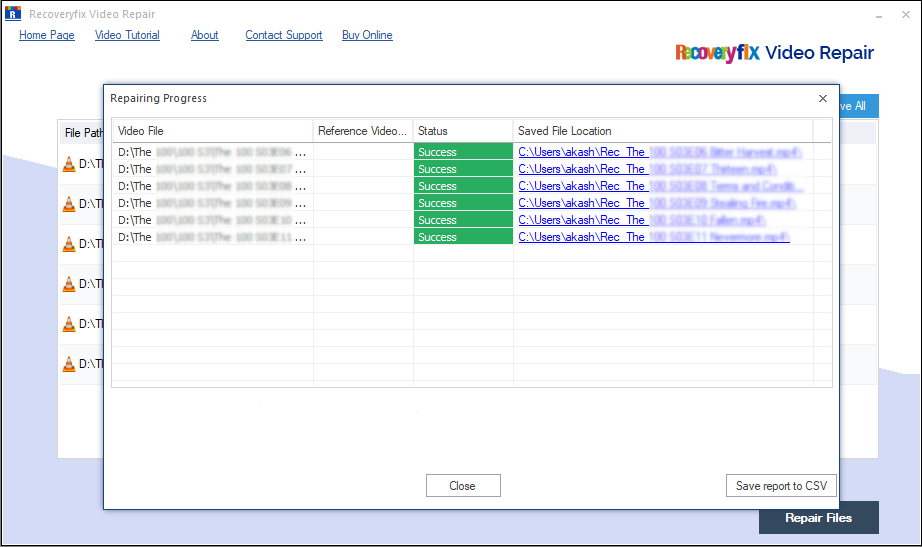
- The tool will start repairing all the files and you will get the live updates of repair in progress. Once the process is over, click on OK to finish the process.
- You can also click on the Save Report to CSV option to save the CSV report of the work done. A sample of the CSV report is added below.
Note: You can remove the unwanted selections by clicking on the Remove option. You can remove all of them at once by clicking on the Remove All option.
Once you follow all of the steps mentioned above successfully, you will get the repaired AVI video files saved at your selected destination.
Conclusion
In this blog we have discussed corruption in AVI video files and what may lead up to it. We have listed a few manual ways for those who are looking for free methods. However, for people seeking an easy, time-saving and result-oriented solution, we recommended using Recoveryfix Video Repair tool, which can also repair corrupt MP4 video files. We have also mentioned a step-by-step guide to use the tool and discussed some of its unique features. For a better insight, try the trial version of the tool and save up to 30 seconds of the video file for free.


