Frequently Asked Questions on Recoveryfix IMAP Migration
- Cloud Data Backup
Recoveryfix Migration for IMAP - FAQs
If you don’t find an answer to your question and want to need an immediate assistance, please reach out to our live chat support team.
IMAP migration is the process of moving email data from an IMAP-enabled email system to Office 365 or Microsoft 365. Such complex data transfer requires the need of a professional utility like Recoveryfix Migration for IMAP. It’s a user-friendly tool that can perform migration across several IMAP servers such as Google Mail, Yahoo Mail, AT&T, IBM Lotus Notes, and more. The migration process is so simple – add the source and destination, apply filters and begin the email transfer.
Manual IMAP to Microsoft 365 migration requires the users to be comfortable with various aspects of Microsoft 365 and Exchange, like PowerShell, MRM policies, connection limits, user creation in a Microsoft 365 account, and more. This can be overwhelming for a novice user. Therefore, you should try a specialized tool Recoveryfix Migration to IMAP for straightforward and fast email migration. The tool’s IMAP migration process is relatively simple, allowing anyone to perform transition of emails to Microsoft platform.
The IMAP to IMAP Migration tool provides a secure platform to configure source IMAP & destination IMAP servers for mailbox migration. Steps to add them and begin the email migration are:
- Download and install the IMAP to IMAP Migration tool.
- Launch the IMAP Migration tool and tap on Add under Source IMAP.
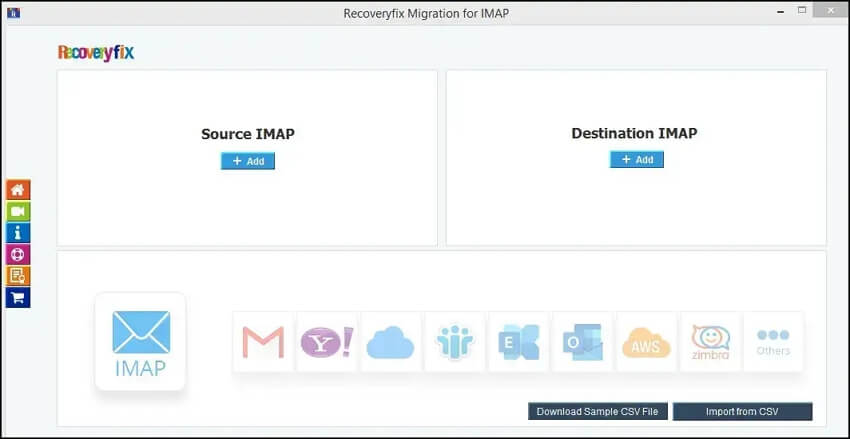
- Fill in all the details, including Server Name, User Email, Password, and Port Number and click on Add.
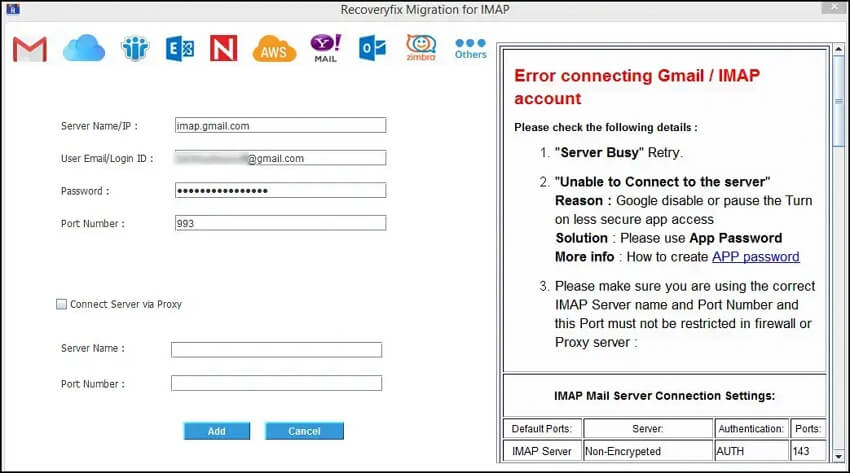
- After the source account is added, click the Add button under Destination IMAP and add the destination server.
- When both source & destination are added, select the Destination Account and click on Set Filter and Migrate to begin the migration process.
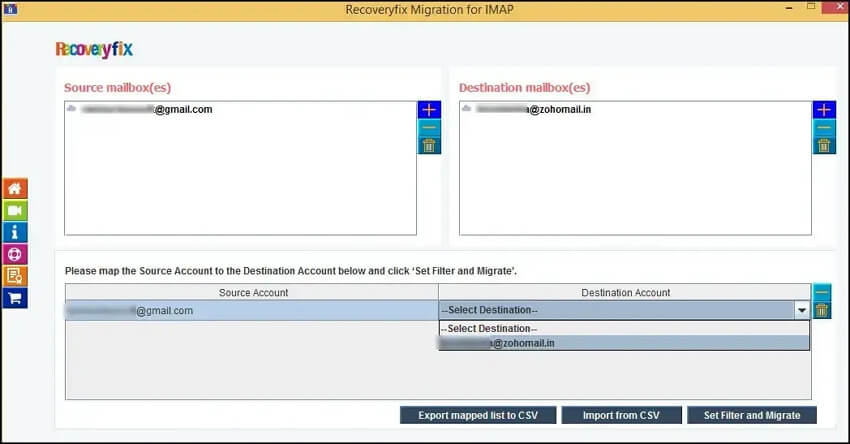
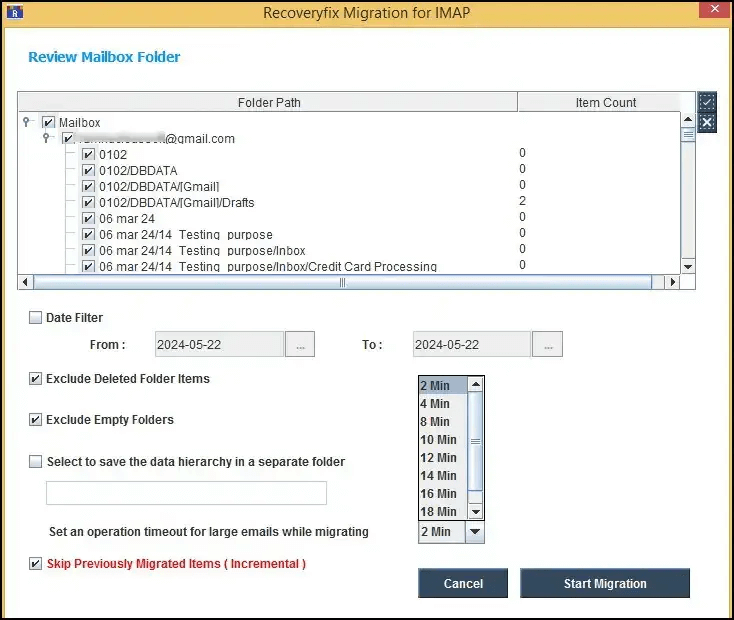
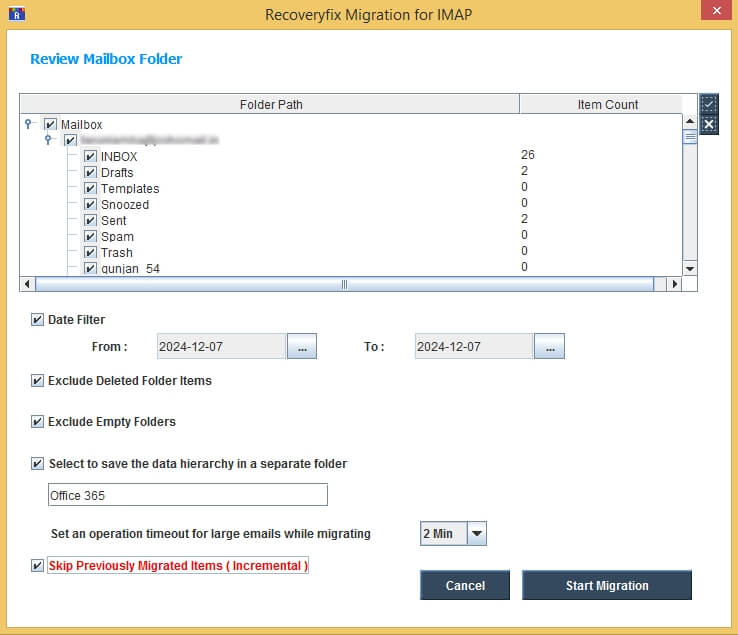
- Apply the various filters and click on Start Migration to begin.
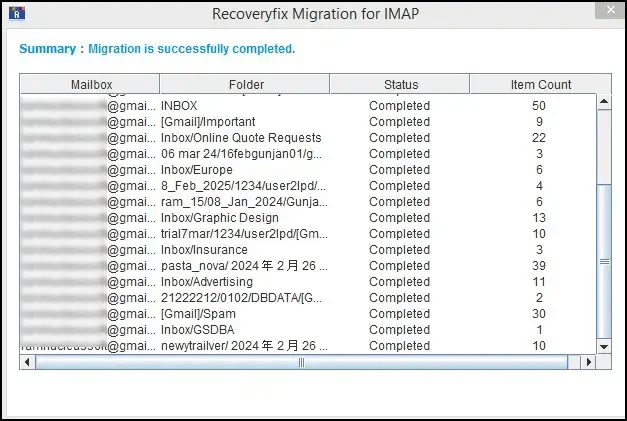
- When migration is done you will get a message stating “Migration is successfully completed”.
IMAP settings are essential for establishing communication with the email server to view and read emails. A user must know how to apply correct IMAP configuration for Office 365 for accessing and migrating emails from one IMAP server to another. IMAP settings for Office 365 are:
| IMAP Server | Outlook.office365.com |
| IMAP port | 993 |
| IMAP encryption | SSL/TLS |
| Authentication methods | OAuth2/ModernAuth |
The tool is specially designed for IMAP to IMAP migration. Therefore, it supports every major IMAP server used in business. The list of IMAP servers supported by the tool are:
Google Mail
Outlook.com
Office365.com
HCL Notes
Yahoo Mail
Yahoo Mail Plus
Yahoo Mail UK
Yahoo Mail Deutschland
Yahoo Mail AU/NZ
AOL.com
Novell Groupwise
AT&T
1&1(1and1)
Zoho MailMail.com
Yes, you can easily migrate Zoho IMAP account directly to Yahoo mail with this IMAP to IMAP Migration tool. Add the Zoho IMAP account to be migrated into the source section and configure the target Yahoo mail server as destination. After adding both, click Set Filter and Migrate. Then, define the data filters and click the Start Migration button to begin the migration. After the tool finishes the email transfer, you can visit the Yahoo server to access the newly added mailbox.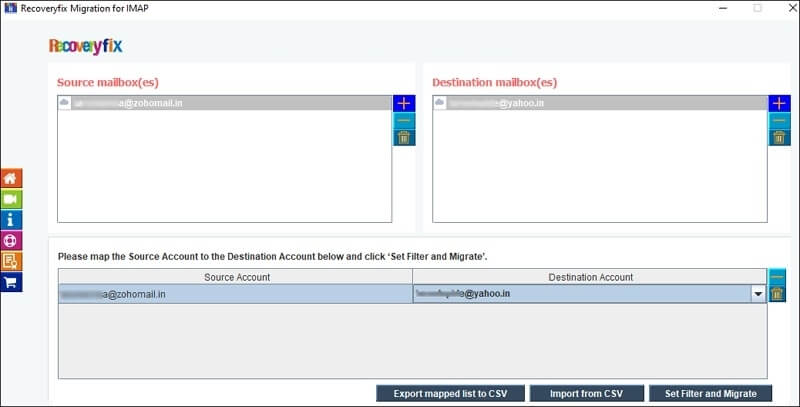
Our robust IMAP migration tool is available on both Windows and MAC OS platforms. Users can select their operating system on the download page before initiating the download. The tool delivers similar performance in both operating systems.
Yes, it allows you to select and unselect the folder present in the mailbox before migration. You can specify folders to migrate from source to destination. This allows user for a user-controlled email data migration. For selecting the folders, follow these steps: add source & destination, then click Set Filter and Migrate. When the tool enumerates the mailbox items in the tool, select and check the folders you want to transfer to the destination and click Start Migration. This way, only the marked folder will be sent.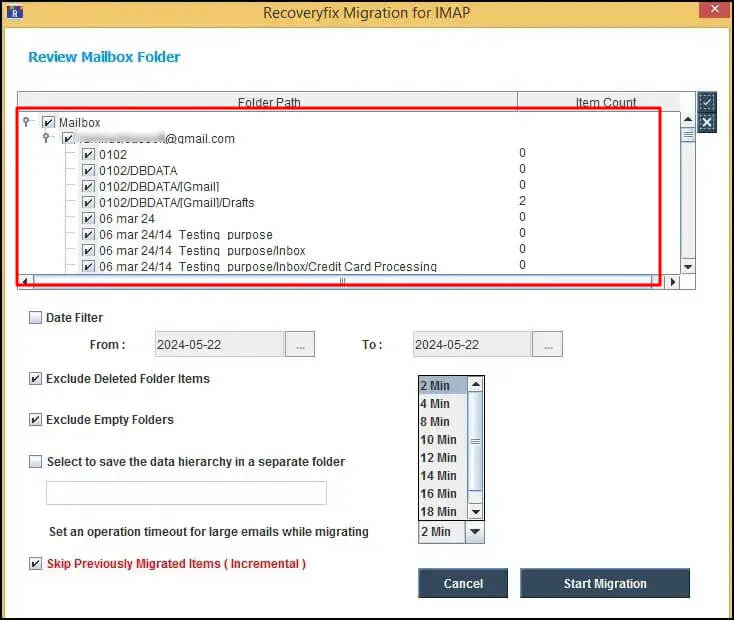
The tool follows strict privacy policies. We at Recoveryfix take concrete steps to ensure users data safety. To allow for secure data transfer our tool uses Basic and Modern authentication login to add & specify your IMAP accounts. Your credentials and mailbox data are completely safe with us. We follow all the data safety and protection guidelines.
Using the tool’s Date Filter, you can define a date range. You can set the start date & end date before starting the migration. The tool will only transfer the emails that lie within the entered date range. This feature is particularly useful in case you want to migrate only the emails received in a particular year of the organization.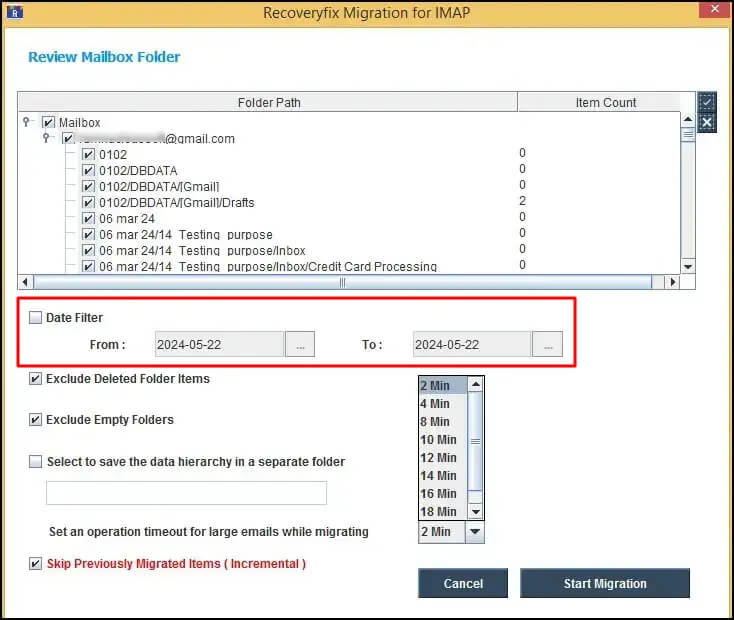
To use the tool, your computer system must have the following system requirements:
Supported Windows operating system: Windows 365, 11, 10, 8.1,8, 7, Vista, 2008, XP, 2002, and 2000 (both 32-bit and 64- bit)
Windows Server 2022, 2019 & older versions
Basic system’s hardware requirements:
Pentium Class Processor
Minimum Memory Space of 64 MB
Disk Space of 50 MB for files restoration
50 MB Space for Software installation
Recoveryfix offers 24X7 support for its customers throughout the year. You get premium live chat support. Users can connect with our dedicated technical assistance team at any moment. Mail us at support@recoveryfix.com or call us at 1-866-348-7872 to talk to our support team. Our support team is working day and night to provide instant support and solutions to any question. Feel free to contact us.
This IMAP to IMAP Migration tool is your one stop solution to queries like “how to migrate Gmail to Office 365” or “how to transfer emails from G Suite to Outlook 365.” The tool allows you to securely connect Gmail and Office 365 to perform efficient mailbox migration. Complete data integrity and original file/folder hierarchy is maintained throughout the email transfer process.
Our tool can perform seamless transfer of emails from any IMAP server to Microsoft 365. To perform the migration, follow the simple steps:
- Add source IMAP account.
- Add the Office 365 account to the destination.
- Apply filters as needed and start the migration.
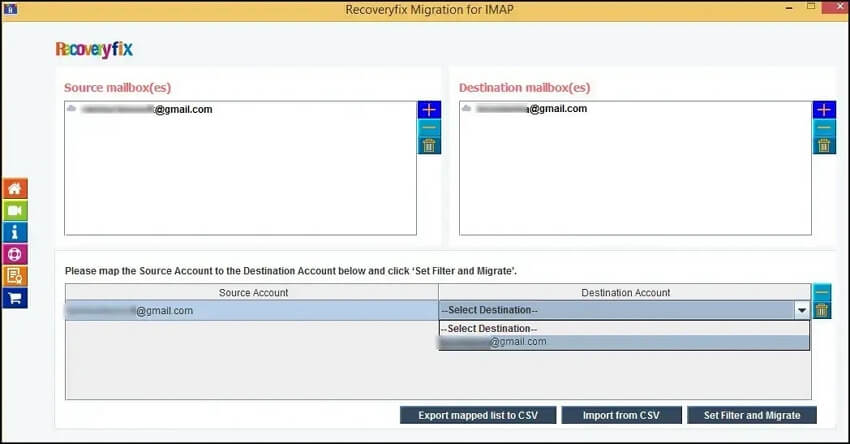
In case you don’t know the details of the source IMAP account, you may find them in the settings section of the email client in which you have configured the account.
Alternatively, you can read the email client’s documentation to understand how to find IMAP server. We also recommend you check the IMAP settings for Office 365 and the source IMAP server before initiating the mailbox transfer.
To view the messages and attachments stored on IMAP server you need an uninterrupted internet connection. Therefore, in case of any network disturbance you will not be able to access your mailbox. Thus, saving an offline copy of the emails is considered a great practice to increase data availability.
With IMAP you can use login credentials in plaintext. This can be a security threat in case of a brute force attack. Also, cyber criminals often used phishing emails to infiltrate or infect the company email server. Therefore, it is recommended to set up a strong firewall and educate the employees regarding the latest cyber-attacks. The best way to protect your data is prevention, awareness and impenetrable security mechanisms.
The tool can transfer emails from Gmail to Gmail. Additionally, you can also migrate IMAP to Google Workspace. To quickly transfer a mailbox from any IMAP-enabled server directly to Google, follow the steps:
- Launch the Recoveryfix Migration for IMAP tool.
- Add the source Gmail account in the Source section.
- Configure the destination Gmail account.
- Apply the filters and begin the migration.
Email migration from one Gmail account to another Gmail account requires the user to input correct IMAP server attributes such as server name, port number, username, and password. The IMAP server settings for Gmail are:
IMAP server: imap.gmail.com
IMAP port: 993
IMAP security: SSL or TLS
IMAP username: Complete Gmail email address
IMAP password: Your Gmail password
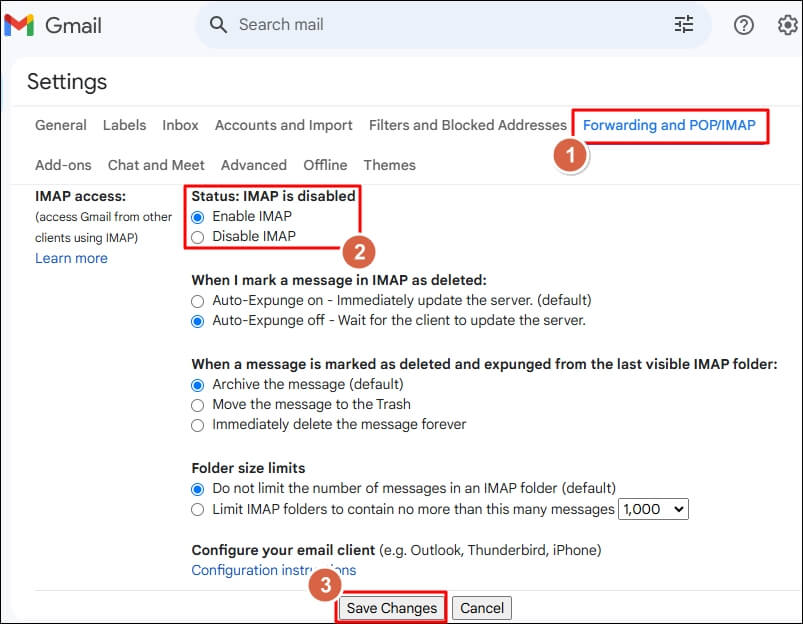
Enabling IMAP in Gmail is a simple process if you know the right steps. To enable IMAP in Gmail, follow these steps:
- Open Gmail in your web browser and log in to your account.
- Click on the gear icon in the top right corner and select "See all settings."
- Click on the "Forwarding and POP/IMAP" tab.
- In the "IMAP access" section, select "Enable IMAP."
- Click "Save Changes" at the bottom of the page to save the changes.
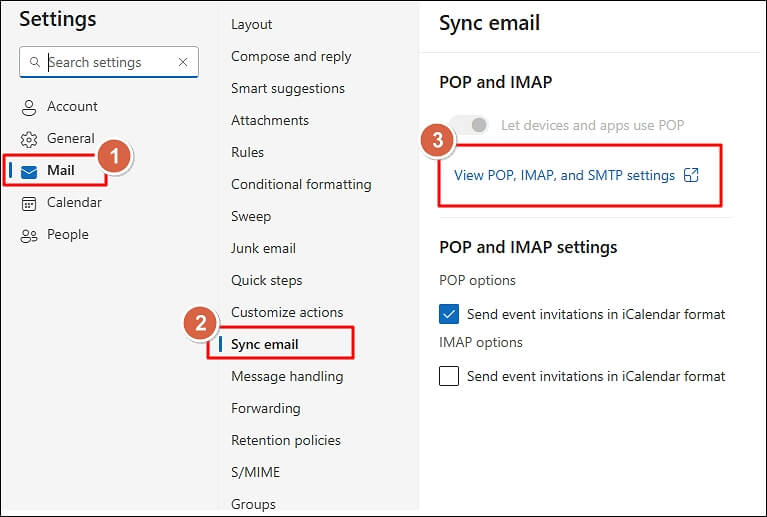
A user must know how to configure IMAP and POP settings in Outlook if they are planning to migrate IMAP to Office 365. To access IMAP settings for Office 365, follow the steps below:
- Navigate to Outlook web and login with your account.
- Click the Settings icon at the top right section of the screen.
- Select Mail, then Sync email.
- Open the link View POP, IMAP, and SMTP settings to view the IMAP configuration for Office 365.
Manually migrating emails from GoDaddy to Office 365 is a challenging task. However, you can skip complicated operations like mailbox selection, user creation in Microsoft 365, finding the right time for data transfer, selecting what to migrate and what to ignore, and many more with the help of an automated tool, Recoveryfix Migration for IMAP. It is a powerful tool specializing in IMAP migrations. It offers a secure platform for complete or selective mailbox migration. Furthermore, you can schedule the migration to begin at a particular time automatically. The unique and robust features of the tool make it a reliable option for quick & safe email transition.
If you are planning a mailbox migration from one IMAP server to another. Then, you will need to know the IMAP details of both source and destination servers. To find the IMAP server settings for your email account, you can follow these steps:
- You can check out the official documentation of the email provider. They must have listed their IMAP server information there.
- You can also view the settings of the email client in which you are using the email account.
- Try to contact your IT support or administrator. They must have the required IMAP server information.
Yes, our IMAP migration tool is capable of migrating multiple mailboxes from one IMAP account to another. The tool maintains complete data integrity and makes sure the original structure of the messages is preserved. The highly optimized algorithms accurately scan and transfer the data with complete precision. To migrate mailboxes in bulk, add the IMAP server to both source & destination, set the email filters, and begin the IMAP to IMAP migration.
Recoveryfix Migration for IMAP provides several smart filters, allowing user to perform customized IMAP migrations. After adding the source and destination you will be presented with data filters based on different parameters, such as:
Select mailbox folders: You can select which folder to migrate and which not.
Date Filter: To specify the start and end date. Only the emails falling in the defined data range will be migrated.
Exclude Deleted Folder Items: Skip the items present in the deleted folder of the source mailbox.
Exclude Empty Folders: Skip the migration of empty folders from the source mailbox.
Operation timeout: Skip an email item that repeatedly fails to migrate within the specified time frame.
Incremental backup: Allows the user to migrate only the data not present in the destination.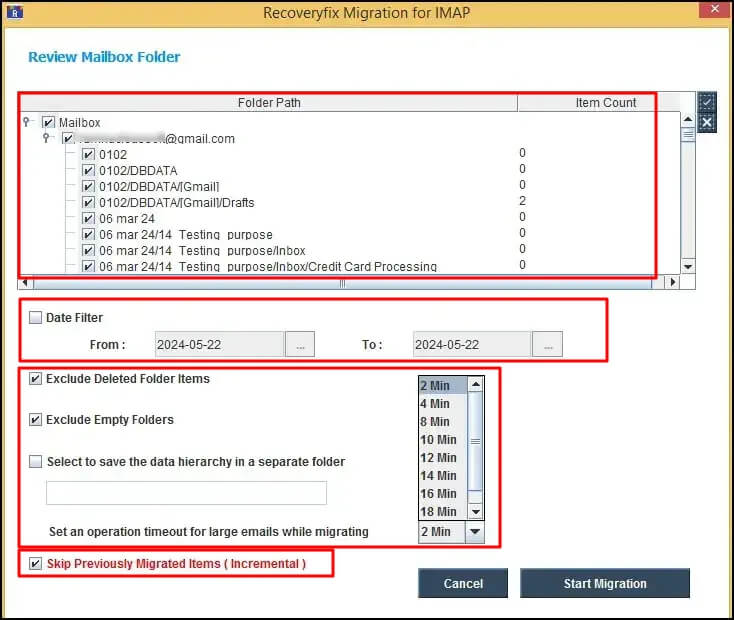
Yes, with this advanced tool you can preview the complete migration process. The tool provides you with real time updates of the transfer of mailbox folders from source to destination. Upon successful transfer, a folder is remarked as completed. This helps the user to know the actual status of the data transfer process. You also get information regarding how many items were migrated from each folder. All this data helps achieve an effective and user-friendly IMAP migration process for any user, whether technically skilled or a beginner.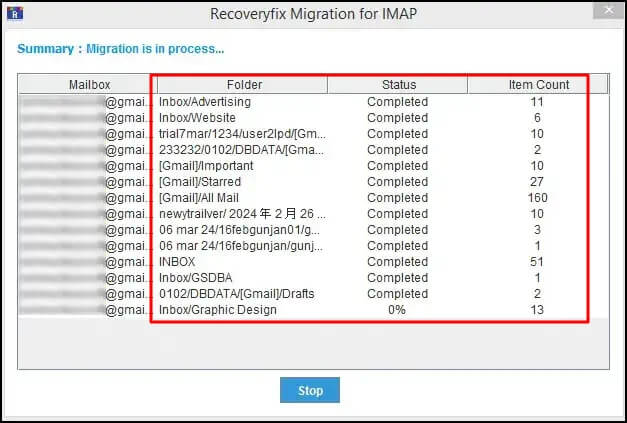
Yes, you can migrate mailboxes of any size with Recoveryfix Migration for IMAP tool. The tool has no restrictions on the mailbox size. Transfer as many mailbox items as you want of any size or format. Our tool delivers robust performance throughout the migration ensuring a complete and reliable email transfer procedure.
Yes, the advanced filters embedded inside the tool let you skip the deleted items folder from the mailbox during IMAP migration. To remove the deleted items from the migration item list, select the option Exclude Deleted Folder Items when applying filters. Additionally, you can also apply filters such as date range, incremental backup, operational timeout limit, skip empty folder, and more.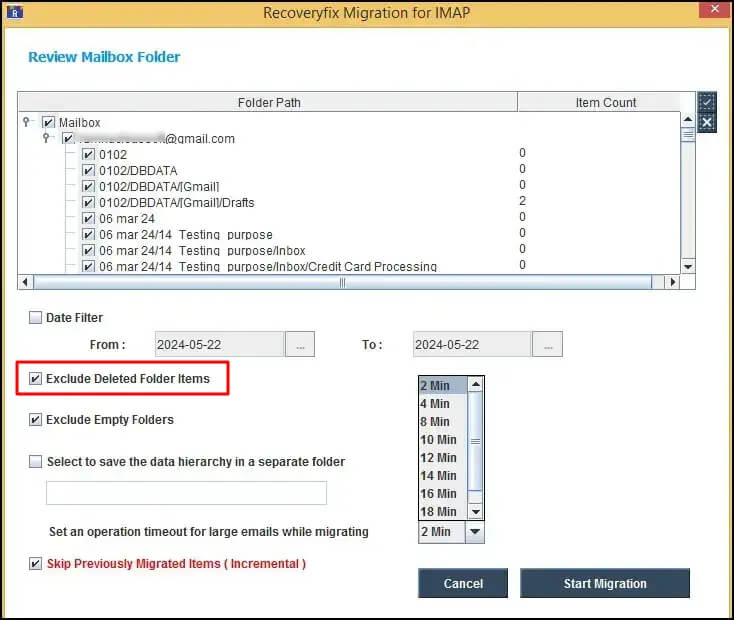
Experience the simplicity of the tool with the demo version, which is available for free. The trial version comes with all the features of the paid version. However, the free version only offers to migrate10 items per folder during the migration. This is the only limitation of the demo version.
The duration of an IMAP migration depends on various factors, including the volume of data being migrated, the performance of the source email system, and the network bandwidth. It is important to plan and schedule the migration accordingly.
To achieve a quick migration speed, it is recommended to try Recoveryfix Migration for IMAP. The tool has robust features enabling efficient data migration throughout the transition process. The tool also allows the user to view the real time progress of data being migrated.
When you initiate the IMAP to IMAP migration task with this tool to ensure to follow some points to complete the data transfer with no interruptions. Make sure there is no hindrance in the network connectivity and close any other task consuming your network bandwidth. Also, do not send any new emails or access the mail server during the mailbox migration. To minimize the downtime during IMAP migration, proper planning is required. Also, thoroughly test the source and destination for any issues to avoid any interruption during data transfer. Also, schedule the migration for a time when server’s load is minimal. Additionally, utilize the tool’s unique features like Exclude Deleted Folder Items, Exclude Empty Folders, Incremental backup, and operation timeout to minimize the time of migration.
Yes, this tool supports incremental migration. The IMAP to IMAP Migration tool ensures that no previously migrated data item is migrated again from source IMAP server to destination server. This helps in keeping the destination free from data duplicity and ensures efficient use of storage. Users can also benefit from this feature in case migration is terminated accidentally and you need to restart it again. To skip the transfer of already migrated data items, ensure to select the option Skip Previously Migrated Items (Incremental) in the tool.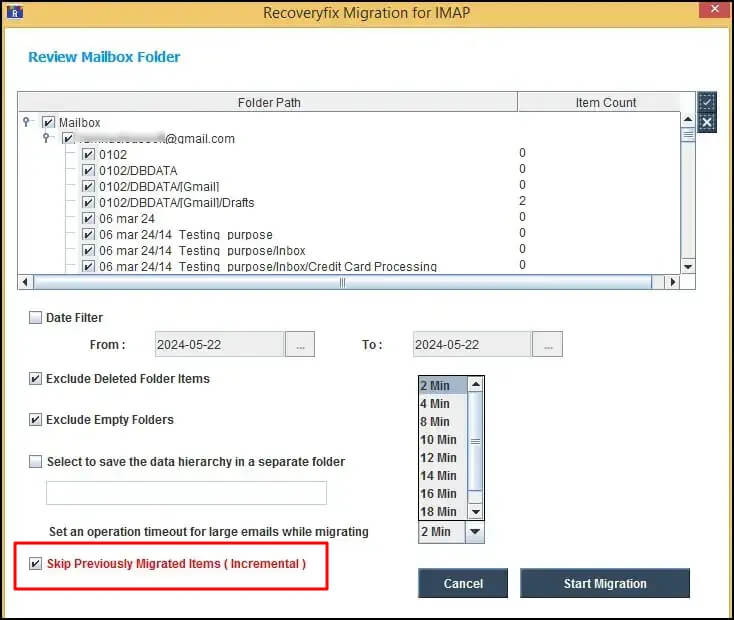
 IMAP to IMAP Migration FAQs