Quick methods to backup OST files [Free Guide]
Have you been working with Outlook for a long time without taking precautions to save your data? Over time, threats also increase with the advancement of technology, so data security becomes a major concern. Necessary action is required if you want to secure & access the same data for future purposes.
Backup OST files to save your data from major unusual threats. It should be a regular practice for users. So, to make it familiar for the users, the article includes all the required information to understand its importance along with practical methods.
Backup OST files: Why?
Understanding the importance to backup Outlook OST files is necessary for security purposes. Here, we have listed some:
- Prevents data from hardships situations.
- Facilitates ease of auditing or evaluating the data.
- Reduces efforts to migrate data into another system.
- Helps in recovery if something unusual happens to it.
- As you backup OST file, it provides easy accessibility even offline.
Best manual ways to backup OST files
This section will cover the native solutions ideal for the backup Outlook OST files process.
Solution 1. Use Outlook Import/Export utility
Outlook’s Import/Export utility provides users the option to perform the Outlook backup OST file procedure. Follow the below steps:
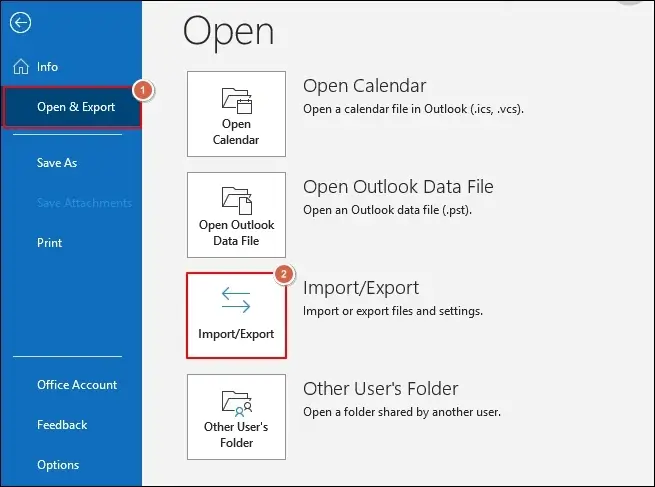
Access the Outlook application & go to the File option.
Tap on the Open & Export option, then click on the Import/Export option.
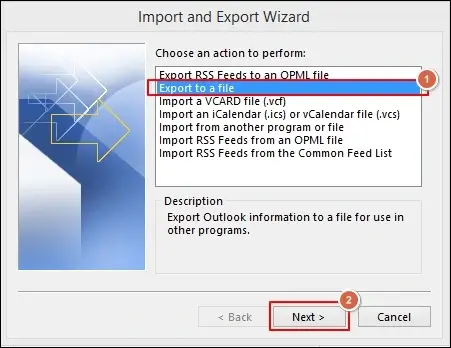
Select the Export to a file option from Import and Export Wizard. Hit on the Next option.
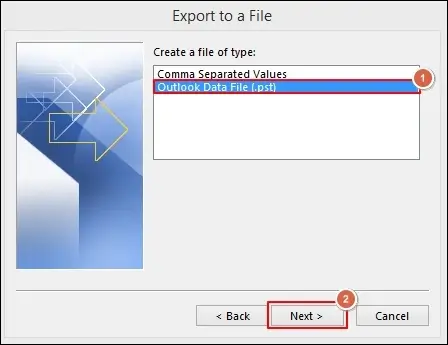
Choose the format in which you want to take backup. Tap on the Next option.
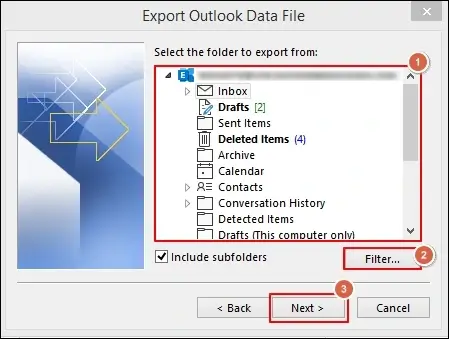
Select the folders to export from and apply the necessary Filter. Tap on the Next option.
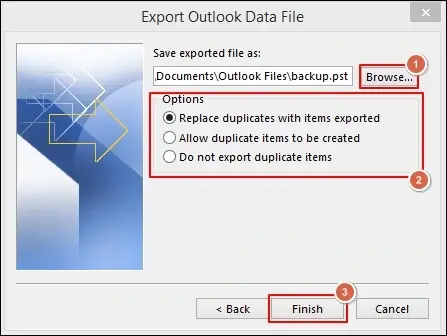
Browse the location where you want to save the backup file with suitable Options. Finally, click on the Finish option. This way, you can backup Outlook OST files to a defined location.
Solution 2. Archive Outlook’s OST file
It is another method to backup offline OST files. With Outlook’s Archive feature, users archive data in the selected format at their defined path. Here are the steps to follow:
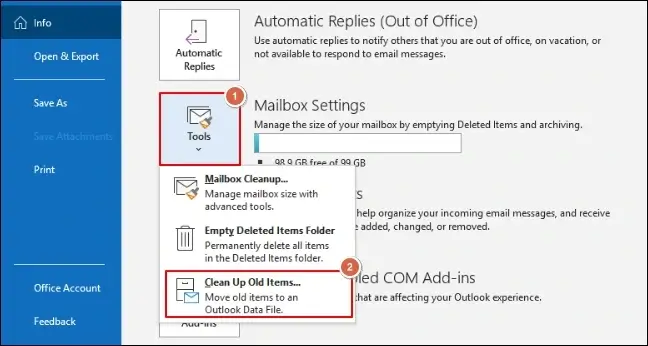
Launch your Outlook application & tap on the File menu.
From the next window, choose the Clean Up Old Items option from the Tools section.
In the Archive wizard, tap on the Archive this folder and all subfolders, and choose the root folder of the OST file. Provide date range as required, check the necessary checkboxes, and hit the Browse option to select the destination for the archived file. Then, click on the OK option.
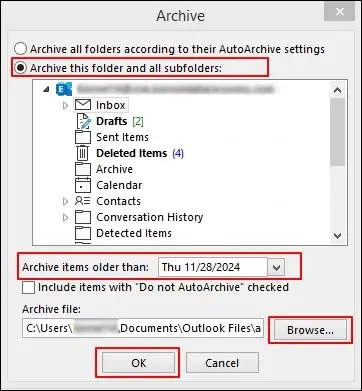
It will start the OST file archiving process, and after a certain time interval, you will get the required file at the defined destination.
Important to know: There is another method in which you need to drag & drop the specific emails in the newly created .pst file to store them locally. Since it is considered the slowest process & unsuitable for bulk backup, it is not used frequently for Outlook backup OST files process.
Alternate advanced way to backup OST files directly & instantly
Opting for manual methods can be more helpful if you want to back up limited data with healthy OST files. If you are looking for bulk files & want complete control of the backup process, they might not be supportive. They also can’t give satisfactory results for corrupted OST files. Going for the automated OST converter can be more beneficial in these scenarios, as it encounters these restraints efficiently.
Recoveryfix OST converter is one such tool that most professionals recommend over others after utilizing its outstanding facilities. It helps users repair & convert inaccessible OST files in multiple formats at the desired location. The tool covers all limitations of manual methods & provides structured data as needed.
FAQs: Your Questions & Our Answers
Is there any manual method to repair the OST files?
Using the ScanPST.exe inbox repair tool, you can repair OST files having minor errors. Otherwise, you need to go with the advanced OST converter to fix severely corrupted files.
How to find the Outlook OST file location in the local system?
You need to follow a few basic steps to locate Outlook OST file location: Go to the File > Account Settings> Account Settings> Data files> Choose the file > Open file location options.
Does deleting the OST files harm data security?
As your OST files are synchronized with the Exchange server, deleting them will not harm any of your OST file's data. You can access data again once you log in to the Outlook application & Exchange server synchronizes with your OST file.
Are there any size limitations while using the OST files?
OST files can store data up to 50 GB. However, improper management can lead to several unavoidable issues.
Conclusion
Hopefully, you got all the relevant information to backup OST files, be it reasons & effective solutions. You can go with any of the methods to execute the backup process as per your needs.
Go with the manual methods for small backups, whereas choose advanced ones if you want quick & 100 % accurate results regardless of number or size limits.