How to Configure Zoho Mail in Outlook?
Email communication is the backbone of any organization, but constantly logging into different platforms can slow you down. By setting up your email accounts like Zoho Mail in Outlook, you can simplify your workflow. It helps you consolidate all your email accounts in one place so that you never miss an important email again. Along with that, it solves the internet fluctuation issues by providing offline data accessibility features.
Let’s explore how you can configure Zoho Mail in Outlook in just a few steps.
What are the benefits of Adding Zoho Mail in Outlook?
Adding Zoho Mail to the Outlook application will allow you to avail of its advanced features. You can refer to the following section to learn about them in detail:
- Outlook provides folders, filters, and categories to keep your Zoho Mail inbox structured and clutter-free.
- It comes with built-in security features and automatic email backups for better data protection.
- You can simplify your communication by keeping your schedule and contacts synchronized.
- Outlook allows you to connect your Zoho Mail with Microsoft 365 tools like Teams, Word, and Excel for better collaboration.
- It automates email sorting by setting up priority notifications and filtering messages based on users’ priority lists.
- Users can access Zoho Mail emails on desktop, mobile, or web with cross-platform compatibility.
How to configure Zoho Mail in Outlook manually?
You can easily configure your account by using Zoho Mail settings for Outlook. To configure your account, you have two options: IMAP and POP3. The final choice depends on you. Here, we have provided the complete steps for both options.
Configure Zoho Mail account in Outlook using IMAP Settings
Follow the given steps to configure Zoho Mail account in Outlook using the IMAP settings:
Points to be remembered:
You have to enable IMAP access for your Zoho Mail account before proceeding with the provided method.
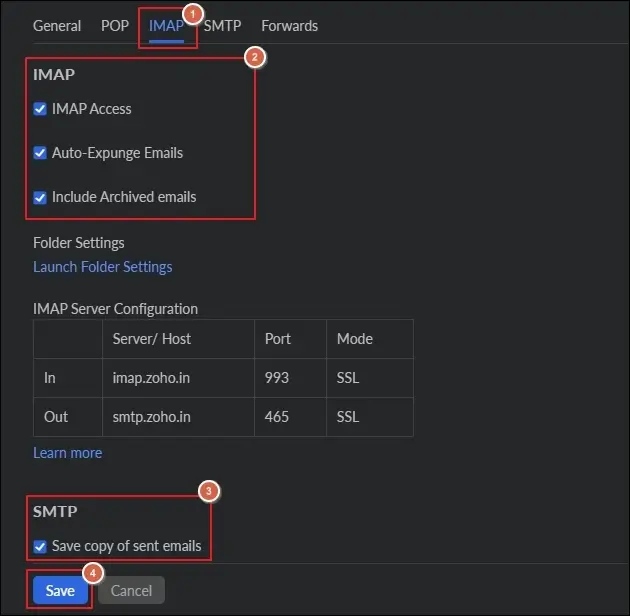
You must know all the Zoho Mail Outlook settings for IMAP. These settings are as follows:
- Incoming server: imappro.zoho.in - for organization accounts (if your domain is hosted with Zoho).
- Incoming Server: imap.zoho.in - for personal accounts (if you have a personal @zoho.com account)
- Outgoing Server: smtp.zoho.in
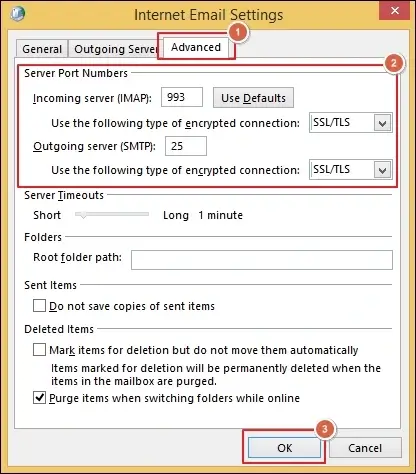
- Incoming Server (IMAP) Port Number: 993
- Outgoing Server (SMTP) Port Number: 465
Step 1. Go to Zoho.com and log in with your account credentials.
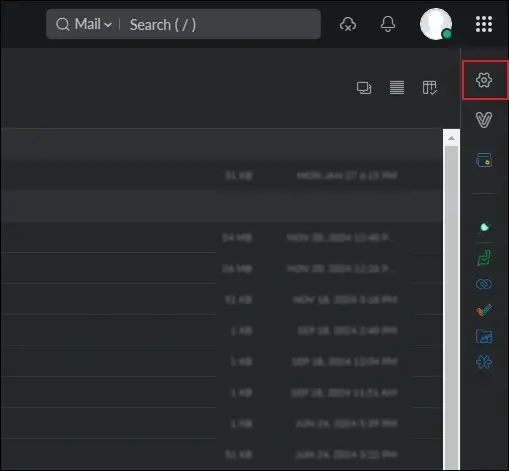
Step 2. Click on Settings options.
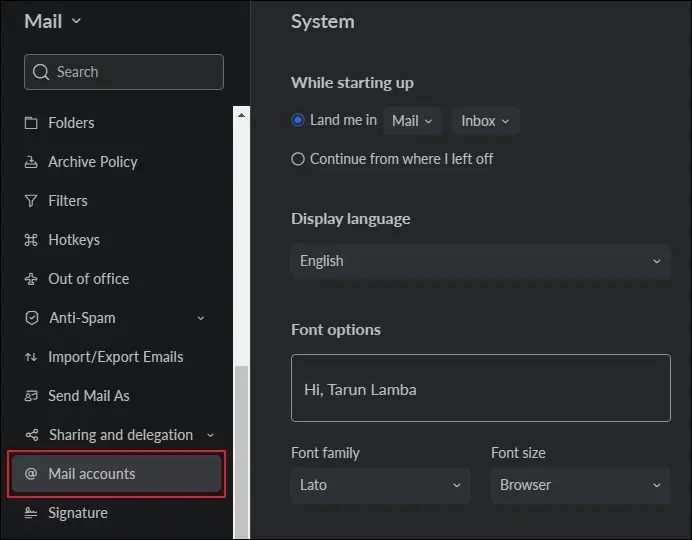
Step 3. Go to Mail accounts under the Settings section.
Step 4. Locate the IMAP tab to enable IMAP Access and other supporting options. Then, tap on Save option.
Step 5. You have successfully enabled IMAP Access in Zoho Mail.
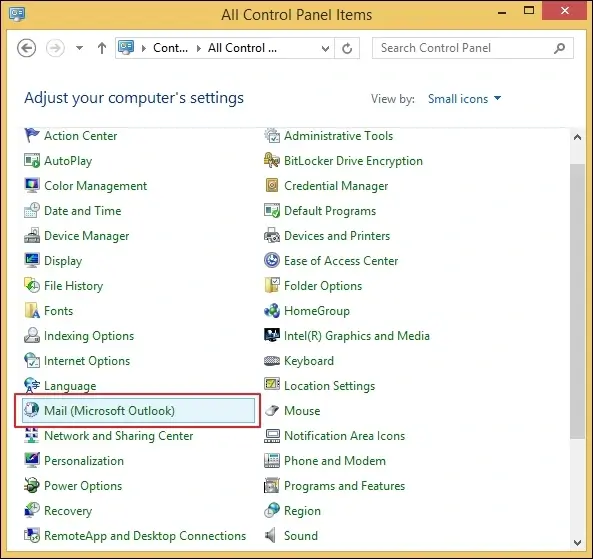
Step 6. Access Control Panel and click on Mail (Microsoft Outlook) option.
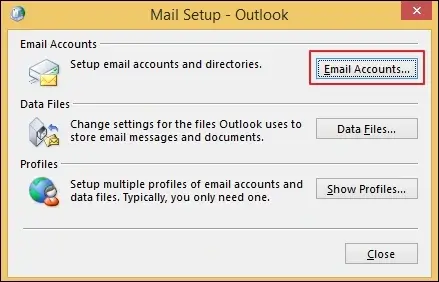
Step 7. Tap on Email Accounts in Mail Setup wizard.
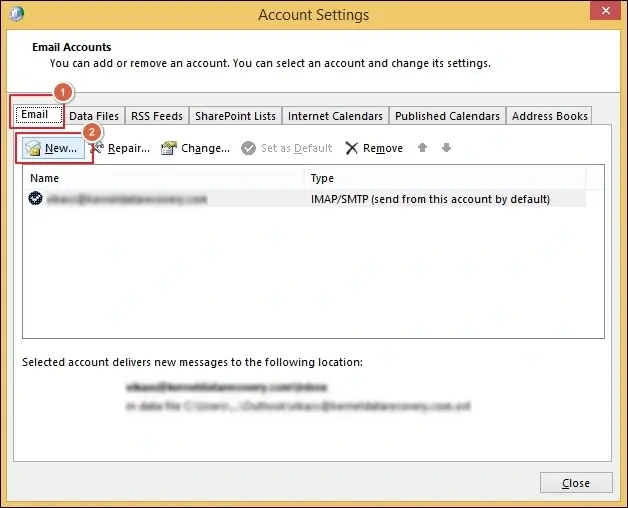
Step 8. Under Email tab, click on New option.
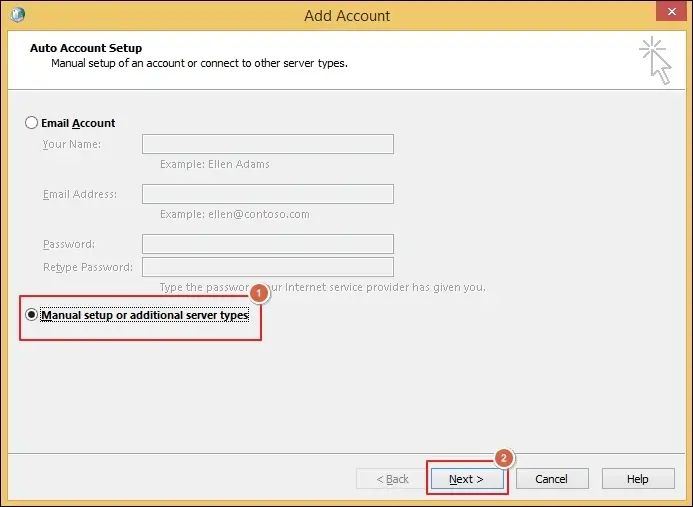
Step 9. Choose Manual setup or additional server types in Add Account wizard and proceed to Next.
Step 10. Select the POP or IMAP option and click Next.

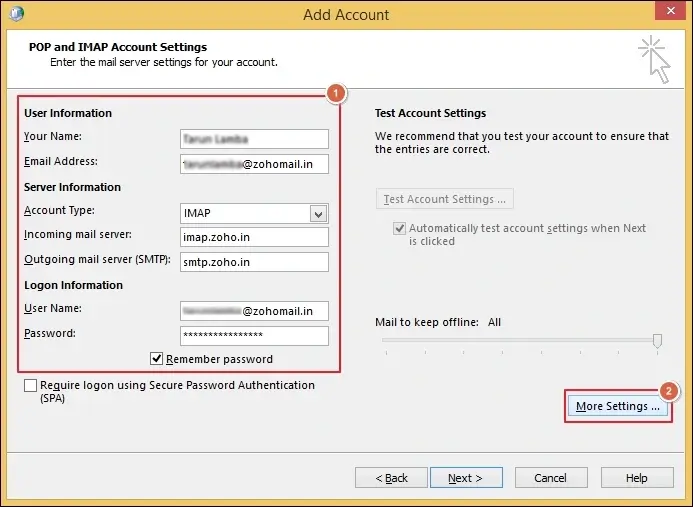
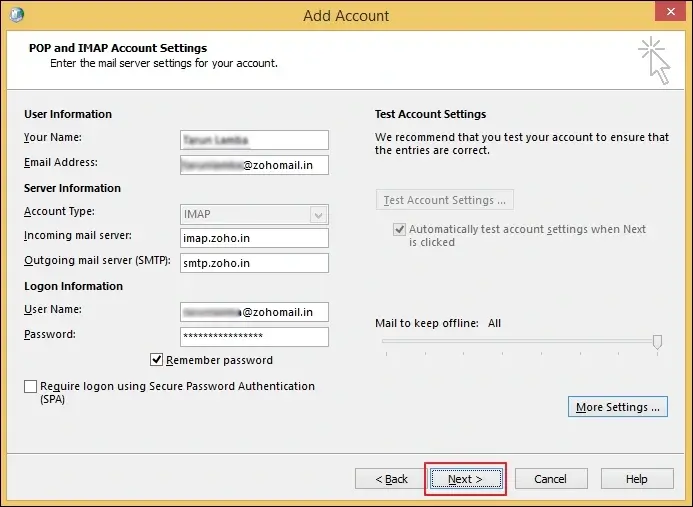
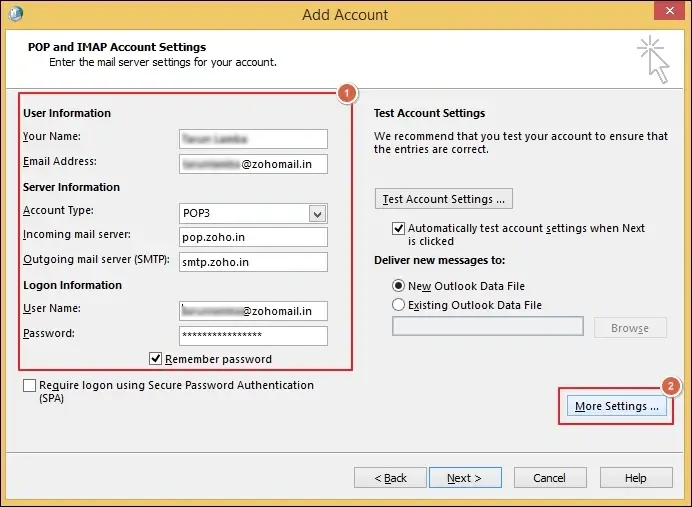
Step 11. Enter your Zoho Mail account details, such as User Information, Server Information, and Logon Information, in their respective fields. Then, check the Remember password option and tap on More Settings option.
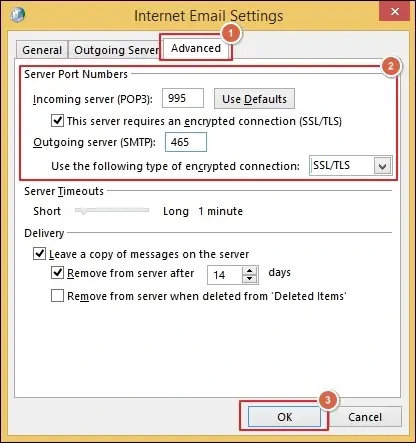
Step 12. Go to Advanced tab, fill in Server Port Numbers, and click OK.
Step 13. Tap on Next option when you have entered all the required details.
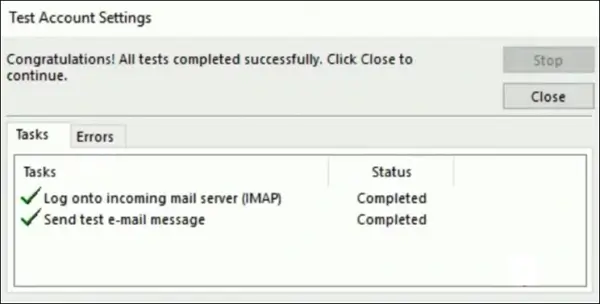
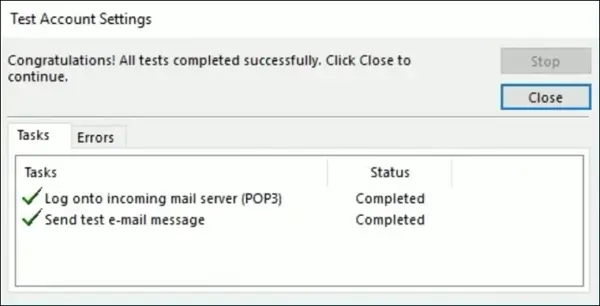
Step 14. Outlook will execute two tests to check your configuration details. Your account will be logged successfully in Outlook application after its completion.
Set up these specific settings also for Outlook IMAP [Additional tips]
- Sent Items
Zoho Mail and Outlook both save the emails you send in the Sent folder. As a result, the file duplicity rate increases with each sent mail. You can avoid this by enabling the given settings:
For Zoho Mail:
Access SMTP settings to turn off the copy created by the server.
For Outlook 2007:
- Choose Options in the Tools menu and click Preferences.
- Go to Email Options to uncheck Save Copies of messages in the Sent Items folder.
For Outlook 2010:
- Choose your Zoho Mail account under the Account Settings. Then, click on Change option.
- Go to More Settings and click on Sent Items. After that, select Do not save copies of sent items.
- Download full messages
Outlook application only downloads Sender, Subject, and Date Information(headers) during email synchronization. But you can change it by using Send/Receive Settings for downloading full messages.
Configure Zoho Mail account in Outlook using POP3 Settings
Here are the detailed steps to configure Zoho Mail in Outlook using the POP3 Settings:
Points to be remembered:
It is necessary to enable POP access for the Zoho Mail account before performing the given procedure.
Zoho Mail Outlook Settings for POP must be known, which are as follows:
- Incoming server: poppro.zoho.in - for organization accounts (if your domain is hosted with Zoho).
- Incoming Server: pop.zoho.in - for personal accounts (if you have a personal @zoho.com account)
- Outgoing Server: smtp.zoho.in
- Incoming Server (POP3) Port Number: 995
- Outgoing Server (SMTP) Port Number: 465
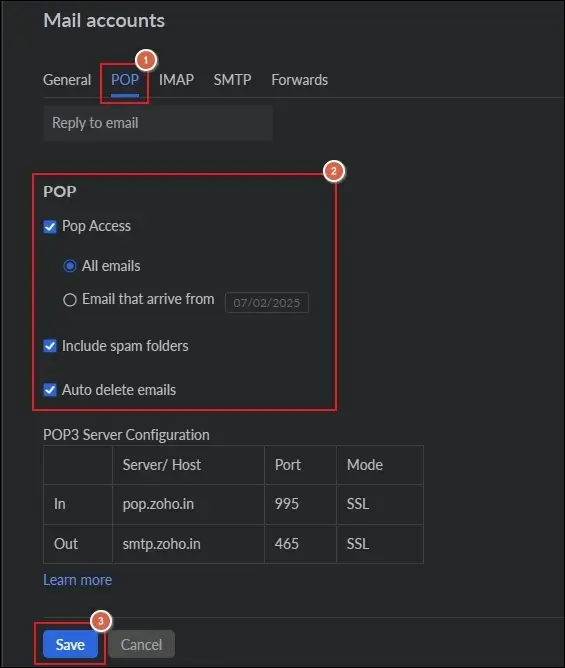
Step 1. Go to zoho.com > Settings > Mail Accounts > POP > enable POP Access.
Step 2. Click on Mail (Microsoft Outlook) option in All Control Panel Items wizard.
Step 3. Select Email Accounts in Mail Setup dialog box.
Step 4. Go to Email tab and click New.
Step 5. Select Manual setup or additional server types and proceed to Next.
Step 6. Choose POP or IMAP as your account type and click Next.
Step 7. Type your Zoho Mail account details, including User Information, Server Information, & Logon Information, and check to Remember password. Then, go to More Settings.
Step 8. Under Advanced tab, enter Server Port Numbers and click OK.
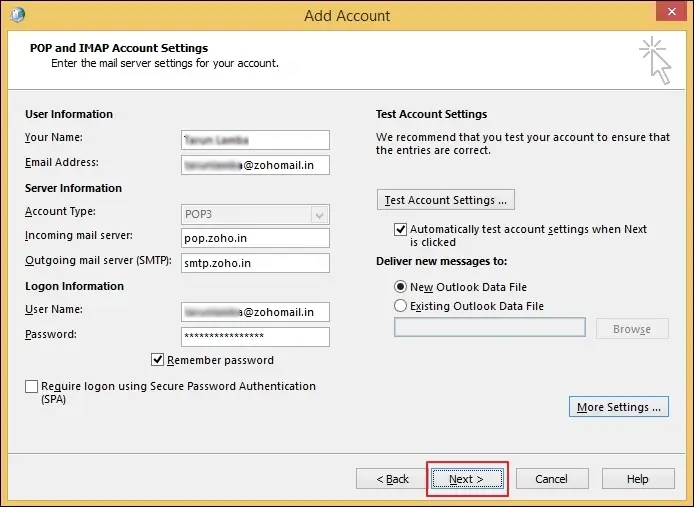
Step 9. Click on Next option when you have entered all the required details.
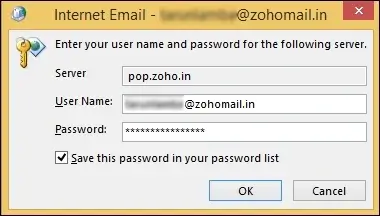
Step 10. Confirm your account details by clicking on OK
Step 11. It will start testing your configuration details. You will see the following pop-up when the tests are successful.
What is the best way to preserve my mailbox data for a longer period?
The above-mentioned methods will help you configure Zoho Mail in Outlook application. No matter how advanced or secure an email client is, experts always recommend taking regular backups of your precious emails to preserve them for future purposes. But how can you do so?
There are two solutions available for you: one is a native solution, and the other one is an automated solution to execute the backup process. The native solution will allow you to take a backup of your emails, but they don’t provide any added features for precise email backup.
On the other hand, automated solutions like Recoveryfix IMAP Backup give you the flexibility to take backups on your own terms. The IMAP Backup tool supports all the mainstream IMAP emails like Google, Zoho Mail, Yahoo, AOL, and many more. On top of that, it helps you to export Zoho Mail to Outlook PST format.
FAQs
Q1- What is the process for Zoho Mail configuration in Outlook?
Ans- Zoho Mail configuration in Outlook follows standard IMAP/POP3 settings. You need to enable IMAP in Zoho Mail, configure incoming and outgoing server details in Outlook, and authenticate using your account credentials.
Q2- How to configure Zoho Mail in Outlook 365 step by step?
Ans- You can easily configure Zoho Mail in your Outlook 365 by using the above-mentioned method. Also, if you are using two-factor authentication, then generate an app password from Zoho Mail.
Q3- How do configure Zoho Mail in Outlook for Mac easily?
Ans- In Outlook for Mac, go to Tools and click on Accounts option. Then, choose the Other Email option under the Accounts wizard. Enter your Zoho Mail account credentials and proceed to Add Account. For detailed steps, visit the Zoho Mail help guide to configure Zoho Mail in Outlook for Mac.
Q4- What are the Zoho Mail Outlook Settings POP3 access?
Ans- You can refer to the “Points to be remembered” section to get the complete details about the Zoho Mail settings for POP3. First, you have to enable POP Access from zoho.com to configure using the POP3 protocol.
Q5- Where can I find the correct Zoho IMAP settings for Outlook?
Ans- We have mentioned all the necessary details of IMAP settings for configuring your account in the Outlook application. Enable IMAP in Zoho Mail settings using the above steps before setting up your account. Get complete IMAP configuration details from Zoho’s support page.
Q6- How to install and use the Zoho Outlook plugin in Outlook?
Ans- Install the Zoho Mail Outlook Plugin from the official site. Open Outlook, configure Zoho Mail Outlook Add-in and log in. This plugin syncs emails, contacts, and calendars smoothly between Zoho Mail and Outlook. Additionally, you can check out the official page to learn more about the plugin’s features.
Why is Zoho Mail not working in Outlook, and how can I fix it?
There can be several reasons behind the issue, such as incorrect IMAP/POP3 settings, disabled IMAP in Zoho Mail, outdated credentials, or firewall restrictions. Therefore, you must assure that you have entered the correct server details, check that your internet is working properly, or update the Outlook application. If issues persist, you use an official troubleshooting guide to resolve them.
Conclusion
Whether you want to configure Zoho Mail in Outlook using IMAP or POP3 protocol, we have covered all the necessary information and solutions with our additional tips. Besides that, you can opt for the recommended solution to backup and store your precious mailbox data in a safe location.
The software provides multiple formats, including PST, MSG, EML, MSG, EML, and many others, for saving your mailbox backed-up data. Also, you can access your precious data even when Outlook cannot connect to IMAP servers.