How to migrate from Exchange Server to Office 365?
- Why users need to migrate Exchange mailbox to Office 365?
- What are the pre-requisites of moving from Exchange to Office 365?
- How to perform Exchange Server to Office 365 migration procedure?
- Want an instant solution to migrate Exchange to Office 365? Try this now!
- Wrap up
Best solution to perform Exchange Server migration to Office 365
Organizations need to be flexible to defend their existence in the dynamic and competitive digital era. To compete with their peers, organizations must be efficient, cost-effective, and productive enough to outperform them. At times, organizations need to shift towards better and more sophisticated technologies to improve their overall performance.
Moving from Exchange to Office 365 is one such transition that organizations perform to maintain their market positioning. However, the Exchange to Exchange online migration seems complicated for some organizations. Hence, the blog will provide a step-by-step guide to migrate exchange to exchange online to avoid hesitation and accomplish the task conveniently.
Let's begin the blog by describing the reasons that led users to perform Exchange Server to Office 365 migration.
Why users need to migrate Exchange mailbox to Office 365?
Users get several benefits when they move Exchange mailbox to Office 365. Here, we have mentioned some of the major perks that drive users to perform this migration.
- Office 365 offers the flexibility to adjust services as needed by the organization. It ensures smooth service customization without hampering the workflow.
- It eliminates the upfront capital expenditure on maintaining physical servers in an organization, making it a cost-effective option.
- As a cloud-based service, Office 365 allows users to access their emails, documents, and productivity applications from anywhere in the world.
- Its integrated productivity applications, such as Word, Excel, PowerPoint, Teams, and SharePoint, enhance collaboration within the organization.
- Office 365 comes with advanced security features, including multi-factor authentication, data loss prevention and threat intelligence helps organization to focus on their business operations peacefully.
What are the pre-requisites of moving from Exchange to Office 365?
Before moving from Exchange to Office 365, specific considerations must be known before executing it. These considerations are as follows
- Organizations can migrate their entire data to Office 365 in a few days. Once this is completed, they can easily manage user accounts in Office 365.
- By utilizing a cutover Exchange migration, you can migrate up to 2000 mailboxes to an Office 365 account. However, it is recommended that you migrate only 150 mailboxes at a time.
- The on-premises Exchange organization's primary domain must be accepted as the owned domain in your Office 365 organization.
- After the migration process is completed, the on-premises Exchange mailboxes will be available as a new user in Office 365. But you must assign licenses to each user whose mailboxes have been migrated.
Note: It is necessary to open TCP ports 6001,6001 and 6004 on the Exchange 2003.
How to perform Exchange Server to Office 365 migration procedure?
After analyzing the situation deeply, we have come up with the best solution to perform migration of Exchange to Office 365. Follow the below-mentioned process carefully to achieve your desired outcome without any interruptions.
Section 1. Prepare certain things for the migration procedure
Make the following changes in your Exchange Server environment before proceeding to the cutover migration process.
Note: If directory synchronization is turned on, turn it off before initializing the migration process. Users can do this with the help of PowerShell.
- Set up Outlook Anywhere (known as RCP over HTTP) on your on-premises Exchange Server for email migration service.
- To execute cutover migration, a certificate issued by a trusted certification authority must be used alongside the Outlook Anywhere configuration.
- Authorize that you can establish a connection to your Exchange organization via Outlook Anywhere with available options.
- Set up Mailbox Replication Service (MRSProxy) on your on-premises Exchange Server to migrate mailboxes remotely to Office 365.
- The on-premises Exchange Administrator account should have all the necessary permissions to access and migrate mailboxes to Office 365.
- Ensures all mailboxes are not hidden from the address list before migration.
- Disable the Unified Messaging (UM) for on-premises mailboxes before migration. Once it is completed, Turn on Cloud Voicemail for users.
- Create a mail-enabled security group in Office 365 before initializing the migration process.
Section 2. Begin the Exchange to Exchange online migration
To simplify, we have broken down this section into several parts so that users can easily migrate Exchange to Office 365.
Step 1. Verify the ownership of your domain
The first step is to verify your on-premises domain in the Office 365 organization. Here are the steps to do the same:
- Go to Office.comand log in to your Microsoft 365 account.
- Access Microsoft 365 admin center by clicking on Admin option.
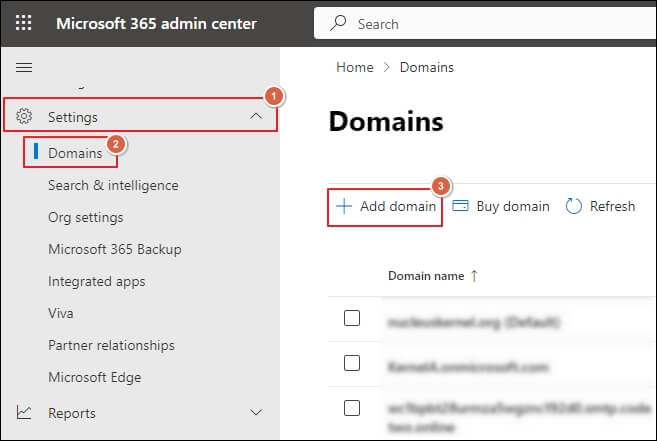
- Go to Settings drop-down, click on Domains option, and proceed to +Add domain.
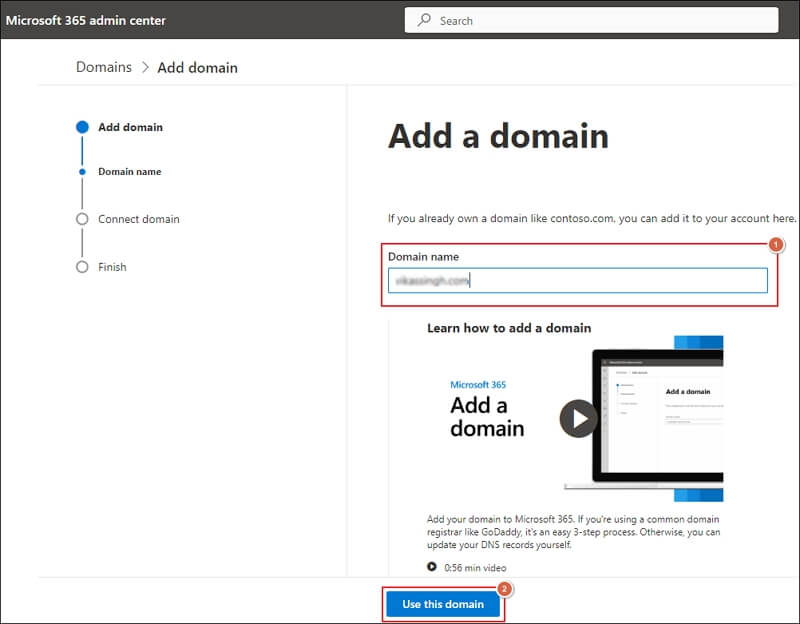
- Enter the Domain name that you use for the on-premises Exchange Server and Click on Use this domain option.
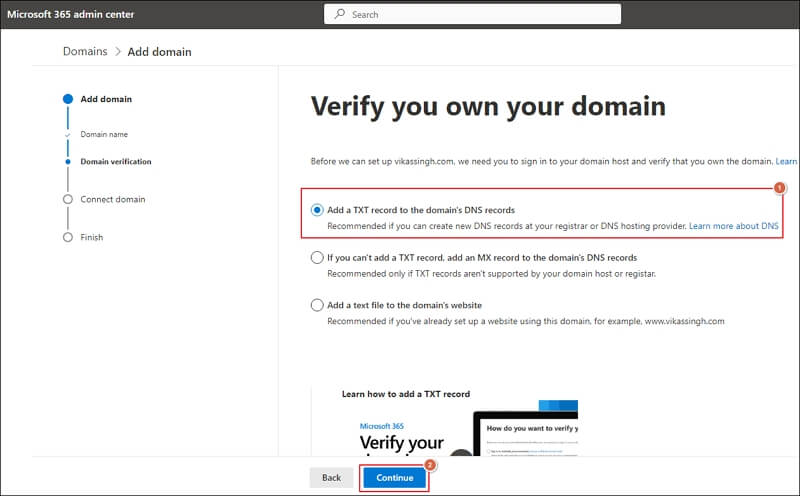
- Choose to Add a TXT record to the domain's DNS record and proceed to Continue.
Note: If the add TXT record option doesn't work for you, you can also select the other available option.
- Add the given TXT record to your domain's registrar or DNS hosting provider. Then, click on Verify option to proceed.
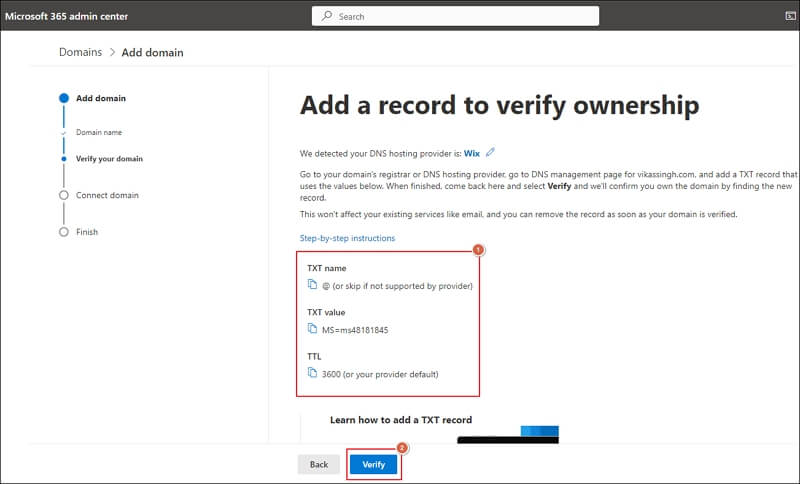
- Tap on Finish option when the verification process is completed.
Step 2. Establish a connection between Office 365 and your email system
A migration endpoint facilitates a connection between on-premises servers and Office 365 for migration. Use the following steps to create an Outlook Anywhere migration endpoint for the cutover migration process.
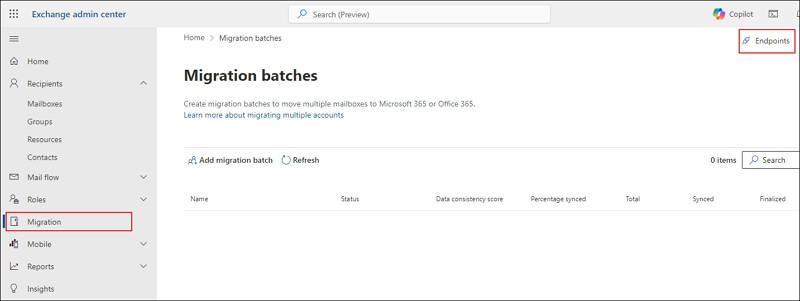
- Go to Migration tab under Exchange admin center and click on Endpoints.
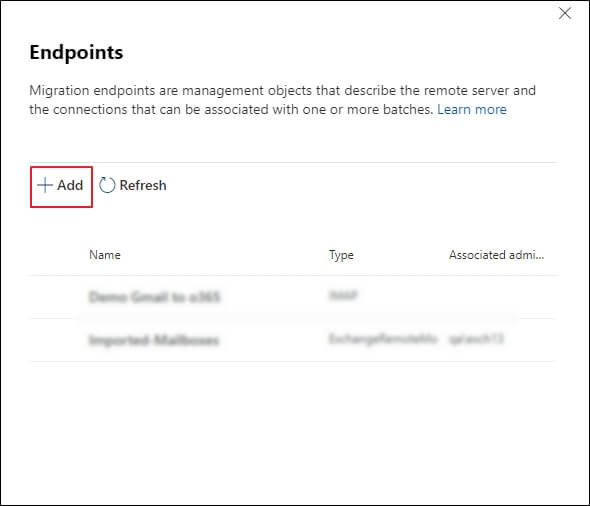
- Create a new migration endpoint by clicking on Add option.
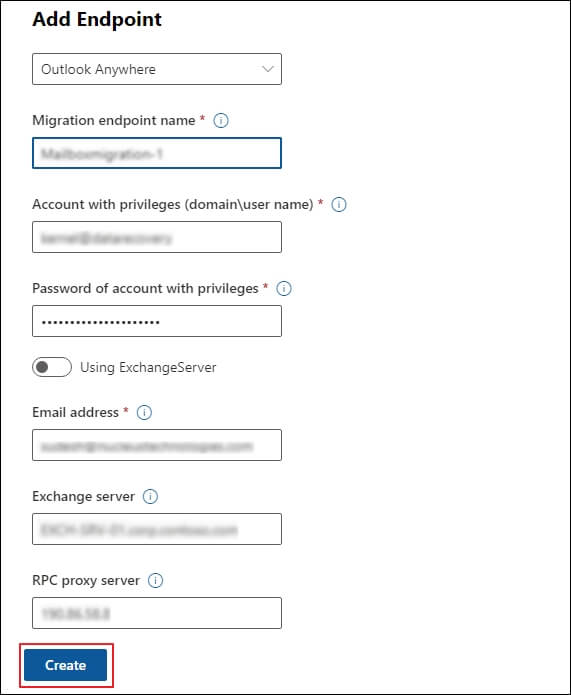
- Enter the required details in their respective columns.
- Select Outlook Anywhere as a migration type.
- Assign an appropriate Migration endpoint name.
- Provide the domain\username of your account that has necessary administrative permissions.
- Type Email address of the account with privileges.
- Enter the RPC proxy server for Outlook Anywhere.
Step 3. Set up a new cutover migration batch
Here are the detailed steps to create the cutover migration batch.
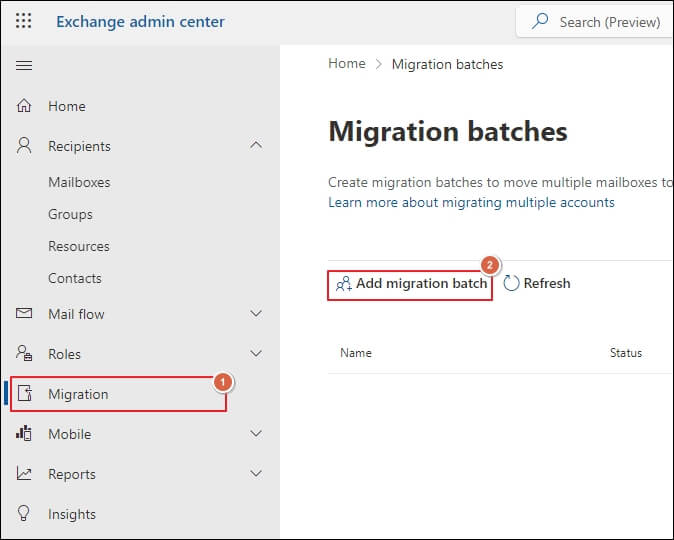
- Access Migration tab under Exchange admin center and click Add migration batch.
- Enter the migration batch name, select the mailbox path, and proceed to Next.

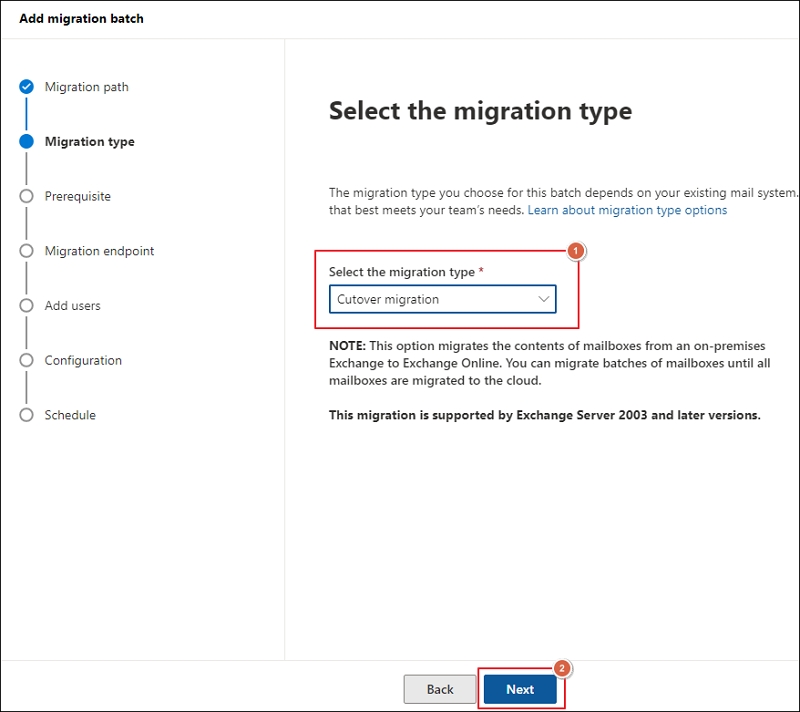
- Select Cutover migration as the migration type and click Next.
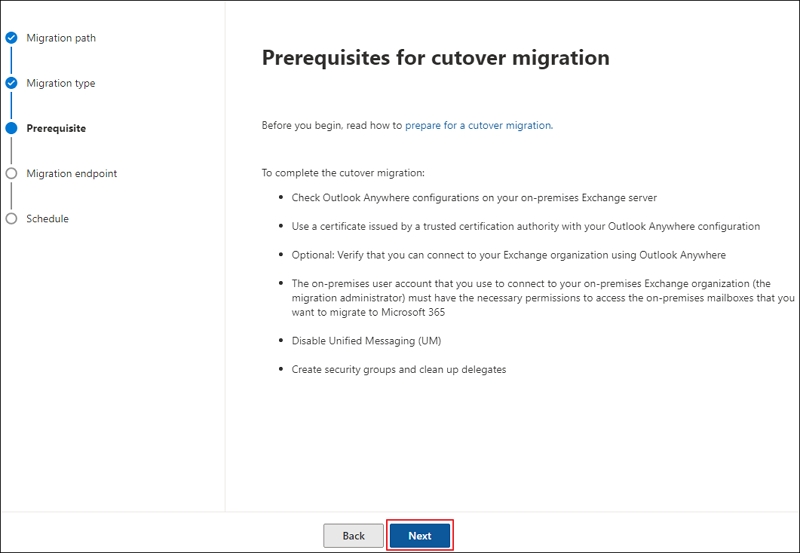
- Ensure all the prerequisites are fulfilled before migration and proceed to Next.
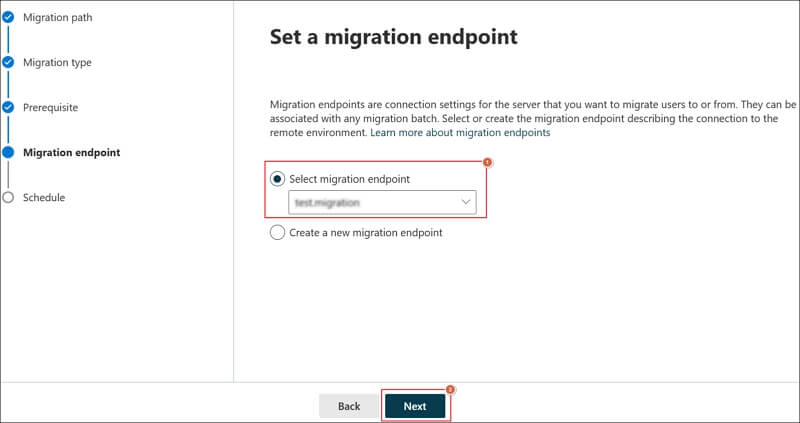
- Select the migration endpoint using the drop-down and click Next.
Note: You can also create a new migration endpoint name.
- Schedule batch migration by selecting the start and end time for the migration.
- Click on Save to create the migration and click Done.
Step 4. Start the cutover migration batch
Resume the migration batch if it is configured to be started manually with the help of the mentioned steps.
- Go to Migration tab under the Exchange admin center.
- Choose the batch from the available list and Resume migration.
- Confirm the pop-up message to initiate cutover migration .
- Migration batch status changes to Starting once it has begun.
Step 5. Route your email to Office 365 directly
MX records, also known as DNS records, are utilized by emails to figure out where to deliver emails. Before or during the migration process, your MX records are configured to deliver emails to the source email system. Once the migration process is completed, change these MX records to Office 365 or Microsoft 365. This ensures that the email is delivered to Office 365 mailboxes. Additionally, it allows you to close your old email system when everything is ready.
Step 6. Delete the cutover migration batch
Verify that all emails are routed to Office 365 when the MX record is changed successfully. The next step is to notify the users that their mail is going to Office 365. Also, ensure the following things before deleting the migration batch:
All the users have migrated successfully and started utilizing Office 365 mailboxes.
Office 365 mailboxes must be synchronized at least once after mail is sent directly to them. You can ensure this by checking that the value in the Last Synced Time box is more recent than the date the mail started.
To delete the cutover migration batch, follow the mentioned instructions carefully.
- Click on Migration tab under the Exchange admin center.
- Choose the migration batch and Delete it.
- Confirm in the pop-up message to delete the migration batch.
- Migration batch is successfully deleted.
After the migration process is completed, licenses must be assigned to the user account to activate them. If you don't assign a license to them within the grace period (30 days), the mailbox will be disabled.
Section 3. Finish the post Exchange Server migration to Office 365 tasks
There are certain tasks post Exchange Server migration to Office 365, that must be completed after the migration process.
- Set up an Autodiscover DNS record so users can easily connect to their new Office 365 mailboxes.
- Once you have ensured that all the emails are routed to Office 365 and you don't want to maintain your on-premises Exchange server, you can decommission it.
Want an instant solution to migrate Exchange to Office 365? Try this now!
Undoubtedly, the above method will help you perform Exchange Server migration to Office 365. However, its involved intricacies make the process time-consuming and difficult for non-tech users. Therefore, to avoid all these restrictions and migrate Exchange to O365 smoothly, utilizing the professional tool will be the best solution.
Recoveryfix Migration for Microsoft 365 is one of the best software available to perform migration of Exchange to Office 365. The Microsoft 365 Migration comes with advanced data sorting filters that help users carry out the migration process accurately and precisely. The Exchange to Office 365 migration tool’s advanced algorithm maintains the data hierarchy and structure intact throughout the entire Exchange 2016 to Office 365 migration process.
Wrap up
The blog has provided a detailed guide on how to migrate exchange to exchange online using the most appropriate manual method. Users can perform Exchange Server migration to Office 365 with the help of the abovementioned illustration. However, this lengthy and time-consuming process motivates users to find better alternatives for smooth migration.
Going with the recommended solution will be the suitable approach in this scenario. It helps users to perform even Exchange 2013 to Office 365 migration. Additionally, you can perform any type of tenant-to-tenant Office 365 migration using this versatile software instantly.